Build your first app with the NotionApps Provisioning Tool
The NotionApps Provisioning Tool turns a description of how your team works into an application you can review, use, and customize. You describe the people, the information they work with, and what each person should be able to do. The tool proposes a plan, then builds the supported parts after you approve that plan.
You can start with new Notion databases or use databases you already have. Depending on the plan you approve, the resulting app can include forms, lists, related records, role-based access, approvals, in-app messages, announcements, and a public Welcome page.
You do not need to write code. You do need to make a few business decisions: who uses the app, what information it stores, who can see that information, and who makes decisions. This guide takes you from those decisions to a tested first app.
The most important step is plan review. Your description is a request. The review screen shows what the tool understood. Correct missing databases, unexpected access, or the wrong approving role before selecting Build application or Create the app.
The screenshots use demonstration workspaces, people, and records. Your names and results will differ. Blue numbers identify controls explained immediately below each image; numbering restarts in each screenshot.
In this guide
- Understand the basics
- Prepare your account and Notion workspace
- Choose how to create your app
- Write a clear directive
- Create an app and new Notion databases
- Create an app from existing databases
- Test and customize the finished app
- Try these directive examples
- Follow these best practices
- Repair tab labels on an existing app
- Troubleshoot common problems
- Questions and answers
Understand the basics
How Notion and NotionApps work together
Notion holds the underlying databases. NotionApps provides the app screens that people use to read and work with that information. For example, a Notion database called Requests can become an app with a request list, a form for submitting a request, and a details screen for opening one request.
The Provisioning Tool helps assemble those pieces. Creating an app is different from merely writing a description: the build can create actual Notion databases, add people, configure application screens, and activate the supported workflows in the approved plan.
Words you will see
| Term | Plain-language meaning | Example |
|---|---|---|
| Maker | The person building and configuring the app. | You, setting up a request tracker. |
| App user | A person using the finished app. | An employee submitting a request. |
| Builder | The workspace where you edit the app's screens and settings. | Where you rename a screen or adjust its fields. |
| Directive | The instructions you type into the Provisioning Tool. | “Employees submit requests. Managers approve requests.” |
| Workspace | The Notion workspace connected to your NotionApps account. | Your team's company workspace. |
| Destination page | The Notion page that will contain newly created databases. | A page called Team Apps. |
| Database | A collection of one kind of information. | Requests, Projects, or Equipment. |
| Record | One item in a database. | A request to repair a printer. |
| Property or field | One piece of information stored on a record. | Request title, Due date, or Estimated cost. |
| Relation | A connection between records in different databases. | A Task belonging to a Project. |
| Screen | A page of the finished app. | My Requests or Add Request. |
| Role | A category of app users with defined responsibilities. | Employee, Manager, or Technician. |
| Seed user | A person added during initial setup. | Your account and two colleagues who will test the app. |
| Approval | A decision by an authorized role on a record. | A Manager approving a Request. |
| In-app message | Communication inside the application. | A conversation between a requester and a manager. |
| Published app | The version people can open through the app link. | The private app your team signs into. |
What the tool can help create
Use the tool for a focused business application built around records and responsibilities: request tracking, work orders, a member portal, a task tracker, or a similar process.
The review controls let you work with database names, who adds records, who sees records, ownership-based visibility, parent-child relationships, approvals, and communication options. In the new-database flow, you can also review additional fields. Supported field choices include text, number, date, checkbox, email, phone, and link. A plan can also include select fields with defined options.
The tool is a starting point for a working application. Review anything listed as Not included or Left out of this build. A request appearing in your directive does not guarantee that it is present in the finished app.
What to keep outside your first directive
Keep the first version focused on supported records, roles, forms, relationships, and approvals. Do not depend on the directive to configure payments, arbitrary external services, email or SMS notification campaigns, or webhooks. Generated formula, rollup, Notion person, and file-upload fields are not supported by this provisioning path. Some of these capabilities may be available elsewhere in NotionApps or Notion and can be configured separately.
Password-setup invitations for initial users are a separate feature from automated business emails. The new-infrastructure path can send those invitations as part of finishing the app; that does not mean a directive such as “email the manager every Friday” creates a scheduled email workflow.
Prepare your account and Notion workspace
Before opening the tool, prepare the following:
- A NotionApps account. Sign in to the account that should own the app.
- Access to the Provisioning Tool. Your plan or account must have this feature enabled. If the interface shows a subscription or access message, resolve that before continuing. Feature availability and usage limits are explained in Plans and entitlements.
- A connected Notion workspace. Connect the workspace from the NotionApps home page. For the authorization steps, follow Connect Notion.
- A destination or existing databases. For a new structure, choose a Notion page where the databases should live. For existing data, identify every database the app needs.
- Permission for NotionApps to access those pages. A connected workspace does not automatically give the integration access to every page. Share the relevant destination and source pages with the NotionApps connection, then confirm that they appear in the picker.
- A small testing group. Decide who will test each role. Have their correct names and email addresses ready.
- A first version of your process. Write down the records, roles, visibility, and approvals you need before adding optional features.
For your first experiment, use a clearly named destination such as Request Tracker Trial. If you are using existing data, decide whether to connect the live databases or a separate test copy. The existing-database path uses the databases you select; it is not automatically a duplicate of them.
Before adding people: In the new-infrastructure flow, listed people can receive password-setup emails when the build finishes. Use people who are expecting access. The
example.comaddresses in screenshots and examples are placeholders; replace them with your testing group's actual addresses in the people form.
Choose how to create your app
From the NotionApps home page, select + Create New App. Choose Create using automation, then Describe your app.
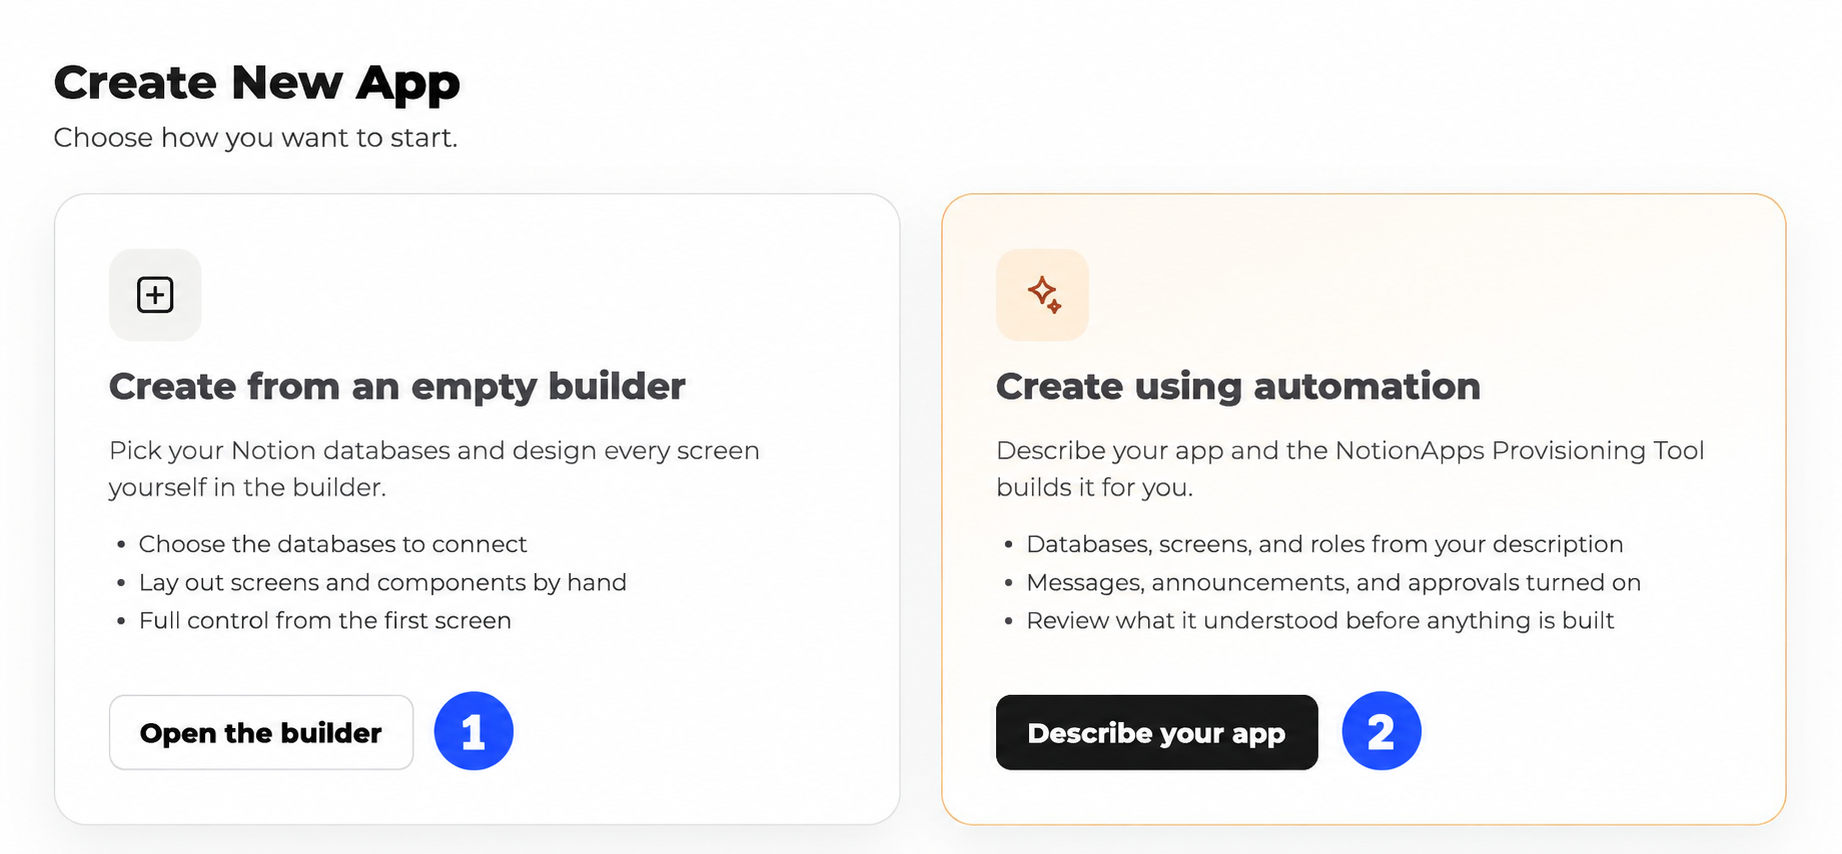
Screenshot callouts
- Open the builder starts the manual creation path. Choose it when you want to design the app yourself.
- Describe your app opens the Provisioning Tool. Choose this for the guided process in this article.
The Provisioning Tool offers three actions.
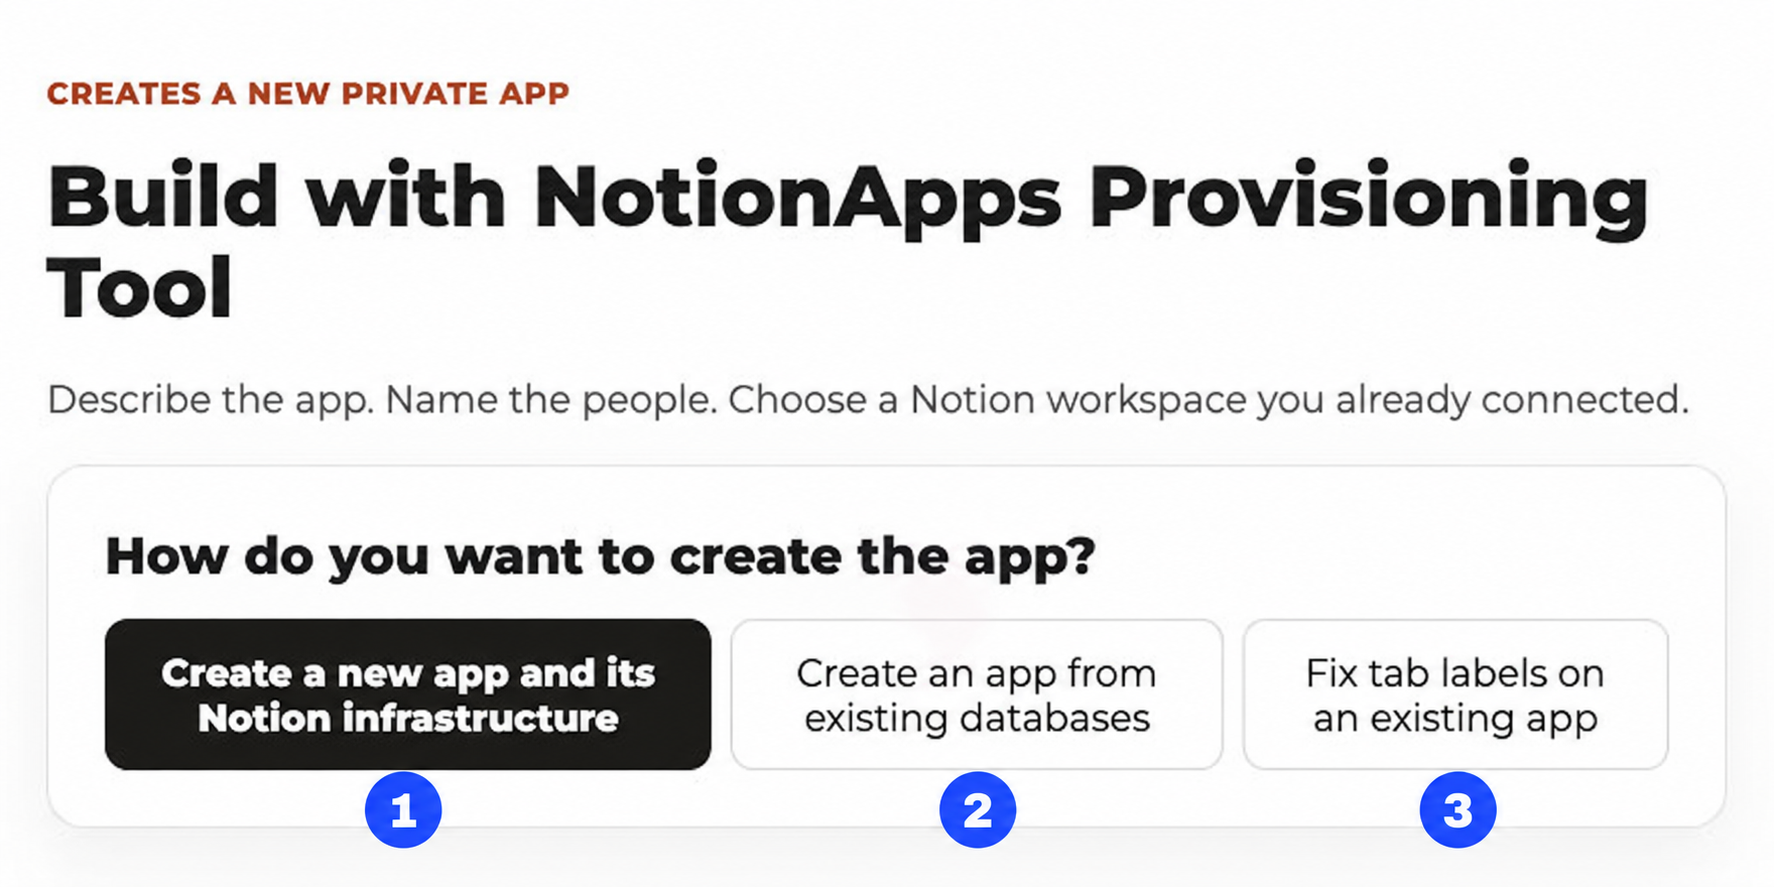
Screenshot callouts
- Create a new app and its Notion infrastructure creates a new app and the supporting Notion structure. Use this when the databases do not yet exist.
- Create an app from existing databases builds around selected Notion databases. Use this when your team already keeps its records in Notion.
- Fix tab labels on an existing app previews and applies navigation-label repairs. This does not create a new application or redesign the existing one.
| Your situation | Choose | What to prepare |
|---|---|---|
| “I have an idea, but no databases yet.” | New app and Notion infrastructure | A directive, people, roles, and a destination page. |
| “My records already live in Notion.” | App from existing databases | Connected databases, a directive using their names, and an access choice. |
| “My app already exists; the tab names need fixing.” | Fix tab labels | The existing app and a review of the proposed renames. |
If you do not see this chooser, confirm that the Provisioning Tool is available for your account. The manual database-picker flow is a different entry path.
Write a clear directive
Describe a process rather than a screen design
A useful directive explains what people do with information. “Make me a professional portal with a dashboard” says little about the records or permissions. “Members submit requests, coordinators review all requests, and members see only their own requests” gives the tool concrete decisions to translate into an app.
Start with one process. You can improve appearance and add more screens after the first version works.
Build the directive from eight parts
| Part | Question to answer | Example wording |
|---|---|---|
| 1. Purpose and name | What is the app for? | “Build a private app called Team Requests.” |
| 2. Roles | Who uses it? | “Roles: Employee, Manager.” |
| 3. Records | What information is stored? | “Employees submit Requests.” |
| 4. Fields | What must each record contain? | “Each Request has a Summary, Needed by date, and Estimated cost.” |
| 5. Actions | Who adds or works with each record? | “Managers review Requests.” |
| 6. Visibility | Which records can each role see? | “Employees see only their own Requests. Managers see all Requests.” |
| 7. Decisions and communication | Who approves, and how do people communicate? | “Managers approve Requests. Employees and Managers send in-app messages.” |
| 8. Relationships and public access | Are records connected? Is any page public? | “Each Task belongs to a Project.” Or: “Include a public Welcome page; everything else requires sign-in.” |
Not every app needs every part. A simple task tracker may need no approvals or public page. Include the pieces that matter to your process, then check the corresponding controls during review.
A first directive you can paste
Build a private app called Team Requests.
Roles: Employee, Manager.
Employees submit Requests.
Each Request has a Summary, Needed by date, and Estimated cost.
Employees see only their own Requests.
Managers see all Requests.
Managers approve Requests.
Employees and Managers send in-app messages to each other.
This is deliberately small. It gives you one main record type, two roles, one approval path, and one communication feature to verify.
Why each sentence is there
“Build a private app called Team Requests.” Sets the intended name and audience. In the new-infrastructure flow, the app starts private. If you use existing databases, still make the matching Private choice in the access step; prose does not replace that control.
“Roles: Employee, Manager.” Establishes the names you will confirm on the people screen. Use these same names everywhere in the directive.
“Employees submit Requests.” Identifies the main database and the role that creates its records. It is more precise than “employees use the system.”
“Each Request has…” Names the extra information you want. Review the generated field names and types; an amount should be a number, and a due date should be a date.
The two visibility sentences distinguish a person's own records from all records. Private app access alone does not make this distinction: private means sign-in is required, while record visibility determines what someone sees after signing in.
“Managers approve Requests.” Names both the object and the approving role. “Managers handle approvals” is less specific.
The messaging sentence asks for communication inside the app. It does not ask for an external email campaign or text-message delivery.
A reusable directive template
Replace the square-bracketed text and remove lines that do not apply. Paste only the completed instructions into the description field.
Build a private app called [app name] for [business purpose].
Roles: [Role A], [Role B], [Role C].
[Role A] creates [record type].
Each [record type] has [field names and simple types].
[Role B] creates [second record type].
Each [second record type] belongs to a [first record type].
[Role A] sees [only their own / assigned / all] [record type].
[Role B] sees [only their own / assigned / all] [record type].
[Approver role] approves [record type].
[Named roles] send in-app messages to each other.
[Named role] posts announcements for [audience].
Include a public Welcome page about [topics]. Everything else requires sign-in.
The template is an outline, not special syntax. Ordinary sentences work. Enter actual users in Roles and seed users, and select the workspace and destination in the tool rather than relying on a sentence to choose them.
Improve an unclear directive
Too vague
Build a staff portal. People can do requests and approvals.
Make it secure and easy to use.
Clearer
Build a private app called Staff Requests.
Roles: Staff Member, Supervisor.
Staff Members submit Requests with a Subject and Needed by date.
Staff Members see only their own Requests.
Supervisors see all Requests and approve Requests.
Staff Members and Supervisors send in-app messages to each other.
The clearer version defines who “people” are, what a “request” contains, which records each person sees, and who approves them. You can test each of those statements after the app is built.
Create an app and new Notion databases
Use this path when you want both the Notion structure and the application created for you. The main stages are Describe → People → Notion → Review → Build.
Step 1 Choose new infrastructure
Select Create a new app and its Notion infrastructure. You will provide a description first, then confirm the people and destination.
Step 2 Describe what you want to build
Paste your directive into What do you want to build? Read it once as if you were explaining the process to a new coworker. Can that person identify the roles, the records, and who sees what?
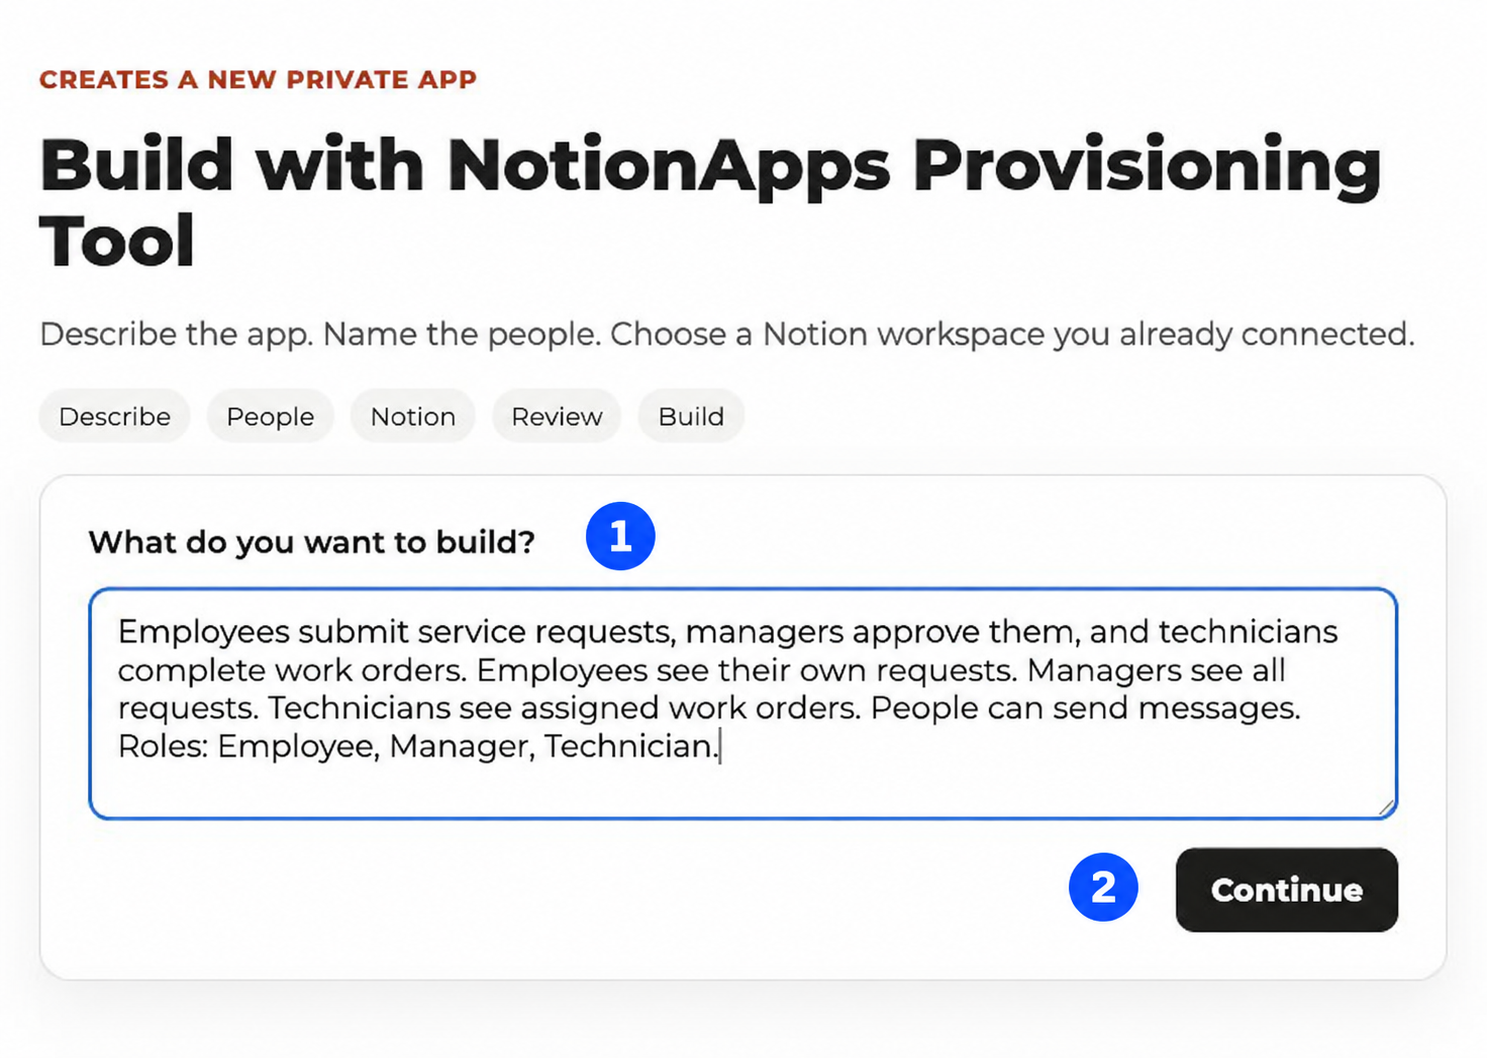
Screenshot callouts
- Description field. Enter the business instructions here. The illustrated example describes requests, managers, technicians, work orders, and messaging.
- Continue. Move to the people step after entering a description.
For a first build, the shorter Team Requests directive above is easier to verify than a process with several handoffs. The screenshot's service-operations example illustrates how a larger directive can describe several roles.
Step 3 Confirm roles and initial users
On Roles and seed users, check that the suggested roles match your directive. Use Add a role and Add role if a role is missing.
Read the duties under each role. A suggested role or recommendation is not proof that the tool has interpreted every sentence correctly. If a Manager is supposed to approve requests, confirm that duty in the later approval controls as well.
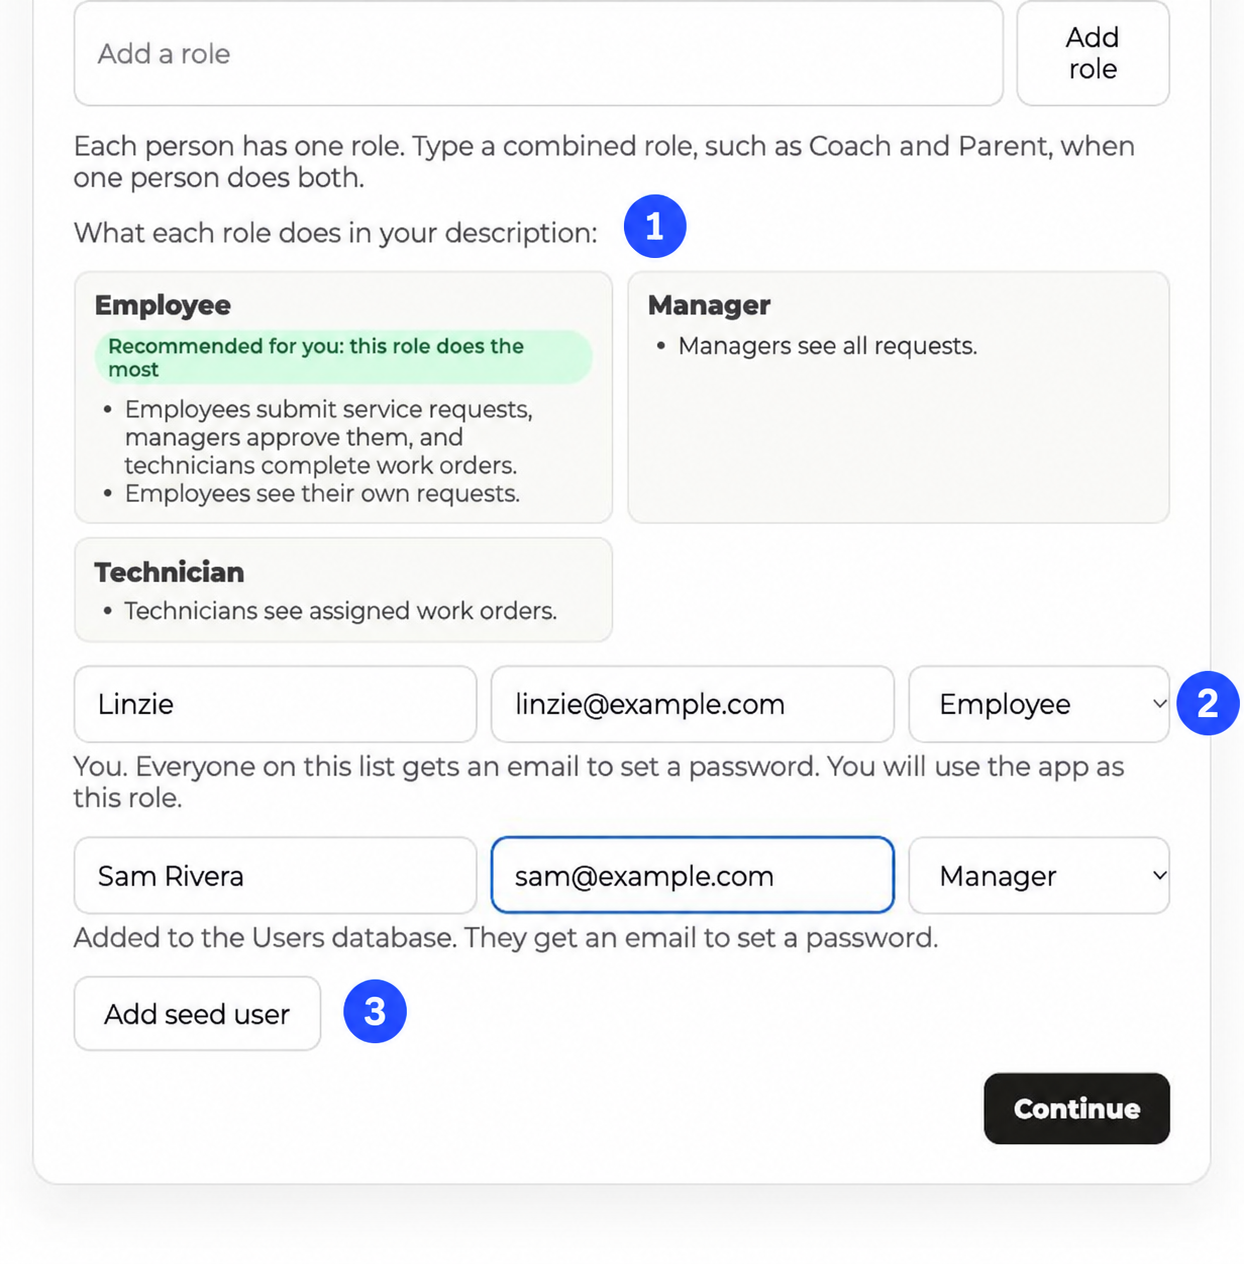
Screenshot callouts
- Role duties. Compare the summary with your intended responsibilities. A missing or misplaced duty is a reason to review the plan carefully.
- Role selection. Choose one role for each person. The first row is you; this controls how you use the finished app.
- Add seed user. Add another initial user, then complete the name, email, and role.
For the Team Requests example, prepare at least one Employee and one Manager. To test privacy properly, add a second Employee using another test account. The manager test account should have the Manager role; merely being the maker does not mean your end-user account has every role.
Each person has one role in this setup. If someone genuinely performs two jobs, create a combined role such as Coordinator and Technician, describe its responsibilities, and select that one role for the person. Do not assume that selecting one role also grants the duties of another.
Check email addresses before continuing. The new-infrastructure flow can send password-setup invitations to the initial users. After building, inspect the result for invitation delivery or access problems. A completed user list does not prove that every message was delivered.
Step 4 Choose where the databases will live
Select your connected Notion workspace. Then choose either an Existing page or Create a new page.
For an existing page, select the destination from the page list. For a new page, enter a New page name and choose the existing parent page under Create it inside. Read the confirmation of the parent page before continuing.
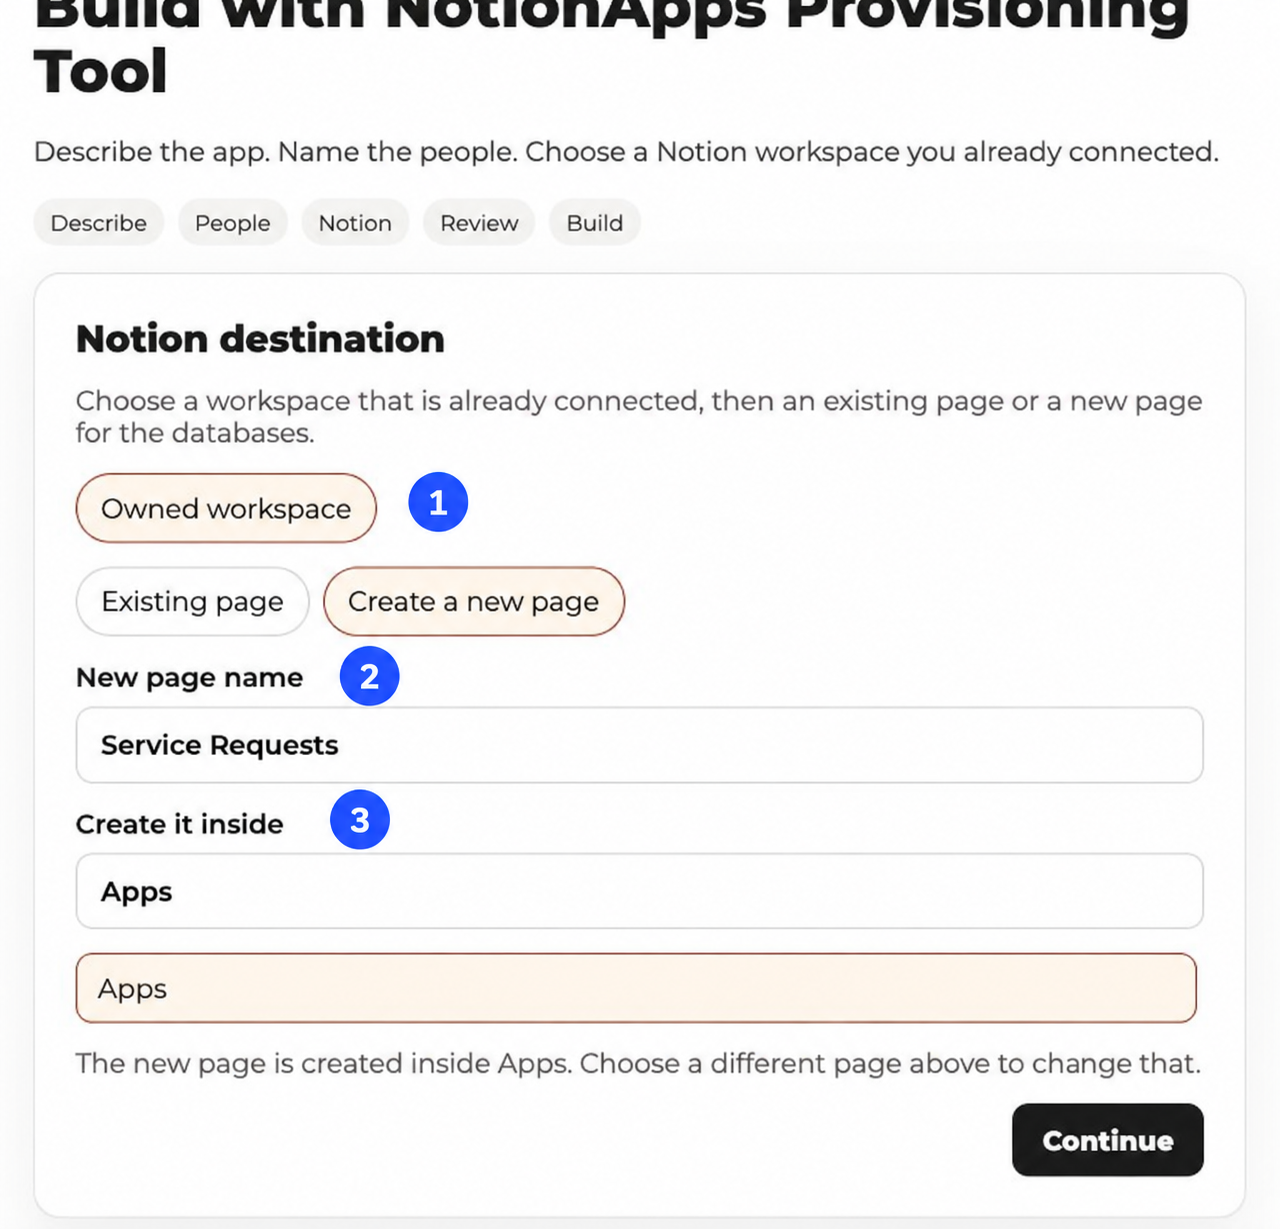
Screenshot callouts
- Workspace. Choose the connected Notion workspace where this app's data should live.
- New page name. Give the container page a recognizable name, such as Team Requests.
- Create it inside. Select the existing parent page. A new container still needs an accessible place to be created.
If no pages appear, confirm that the intended page is shared with the NotionApps connection. Select the workspace again after correcting access. If the list is merely filtered to no results, clear or revise your search.
If the tool asks Which confirmed role may approve?, choose the role responsible for the decision. For Team Requests, that is Manager.
Step 5 Review what the tool understood
The Plan review screen is your opportunity to correct the proposal. Read the app name, roles, initial users, destination, and Here is what I understood before looking at the build button.
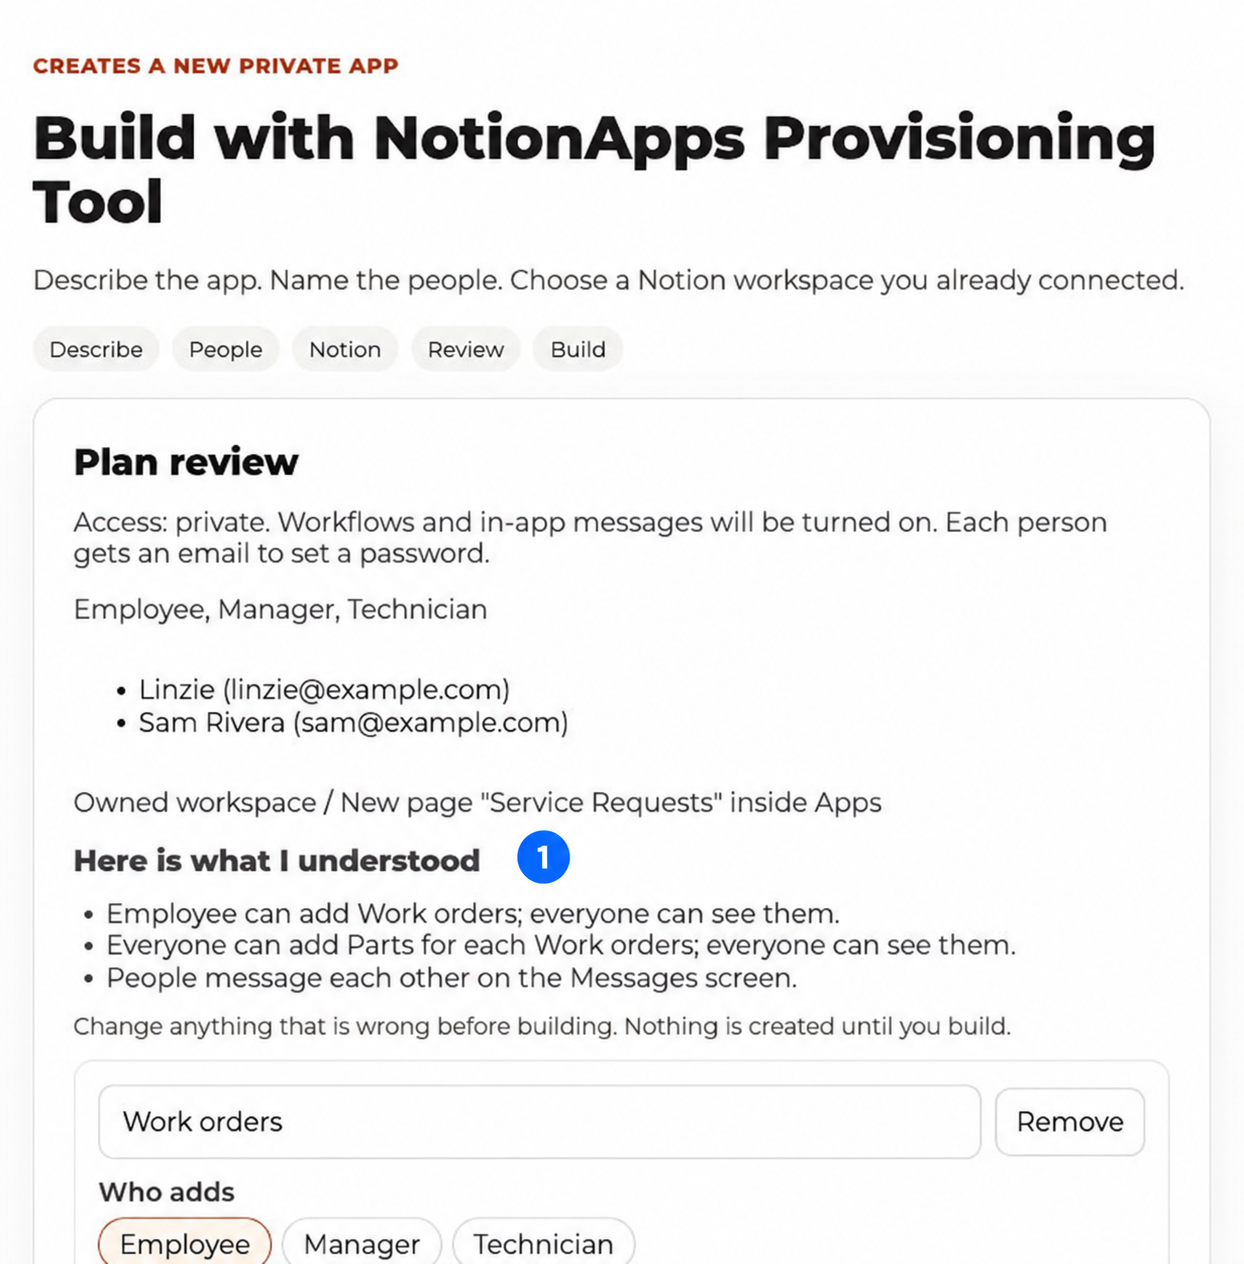
Screenshot callout
- Here is what I understood. Compare every proposed database and access statement with your directive. Edit anything that is wrong before creating the app.
Notice the mismatch in this example. The screenshot proposes Work orders and Parts, and says everyone can see them. If your intended app is Team Requests with employee-only visibility, this is not a plan to accept unchanged. Correct the record names and visibility, remove unexpected records, and add anything missing. The review is an editable proposal, not a confirmation that the original description was perfectly understood.
Work through these checks for every database:
| Review item | What to confirm | Example |
|---|---|---|
| Database name | It represents the information you actually need. | Requests rather than an unrelated Parts database. |
| Who adds | Only the intended roles can create these records. | Employees add Requests. |
| Who sees | The roles listed should be able to view the records. | Manager access is intentional. |
| Each person sees only their own | Ownership restrictions match the directive. | One Employee should not see another Employee's Requests. |
| Belongs to | The parent-child connection is correct. | Tasks belong to Projects. |
| Fields | Names and types capture the information needed. | Needed by is a date; Estimated cost is a number. |
| A message thread for each new one | A separate record conversation is actually useful. | One discussion for each Work order. |
In the review editor, an empty role selection can mean everyone, rather than nobody. Read the explanatory label next to Who adds and Who sees. Do not clear selections assuming that this removes all access.
Use Add a database for a missing record type and Remove for an unwanted one. In the new-database flow, add supported fields where the field controls appear. Standard fields such as Title, Details, Status, and Assigned to are handled by the tool; do not create duplicate versions of them just to repeat a default.
If the tool asks a clarification question, resolve it before building. If it reports that the AI reader is unavailable, treat the displayed plan as requiring especially careful review. Clearer wording and the explicit review controls are more useful than repeatedly submitting the same ambiguous text.
Step 6 Check approvals and communication options
Scroll through the review screen. Choose the record requiring approval and the role that approves it. Additional approval rows represent additional record approvals; do not assume they create a sequential, multi-stage approval chain for one record.
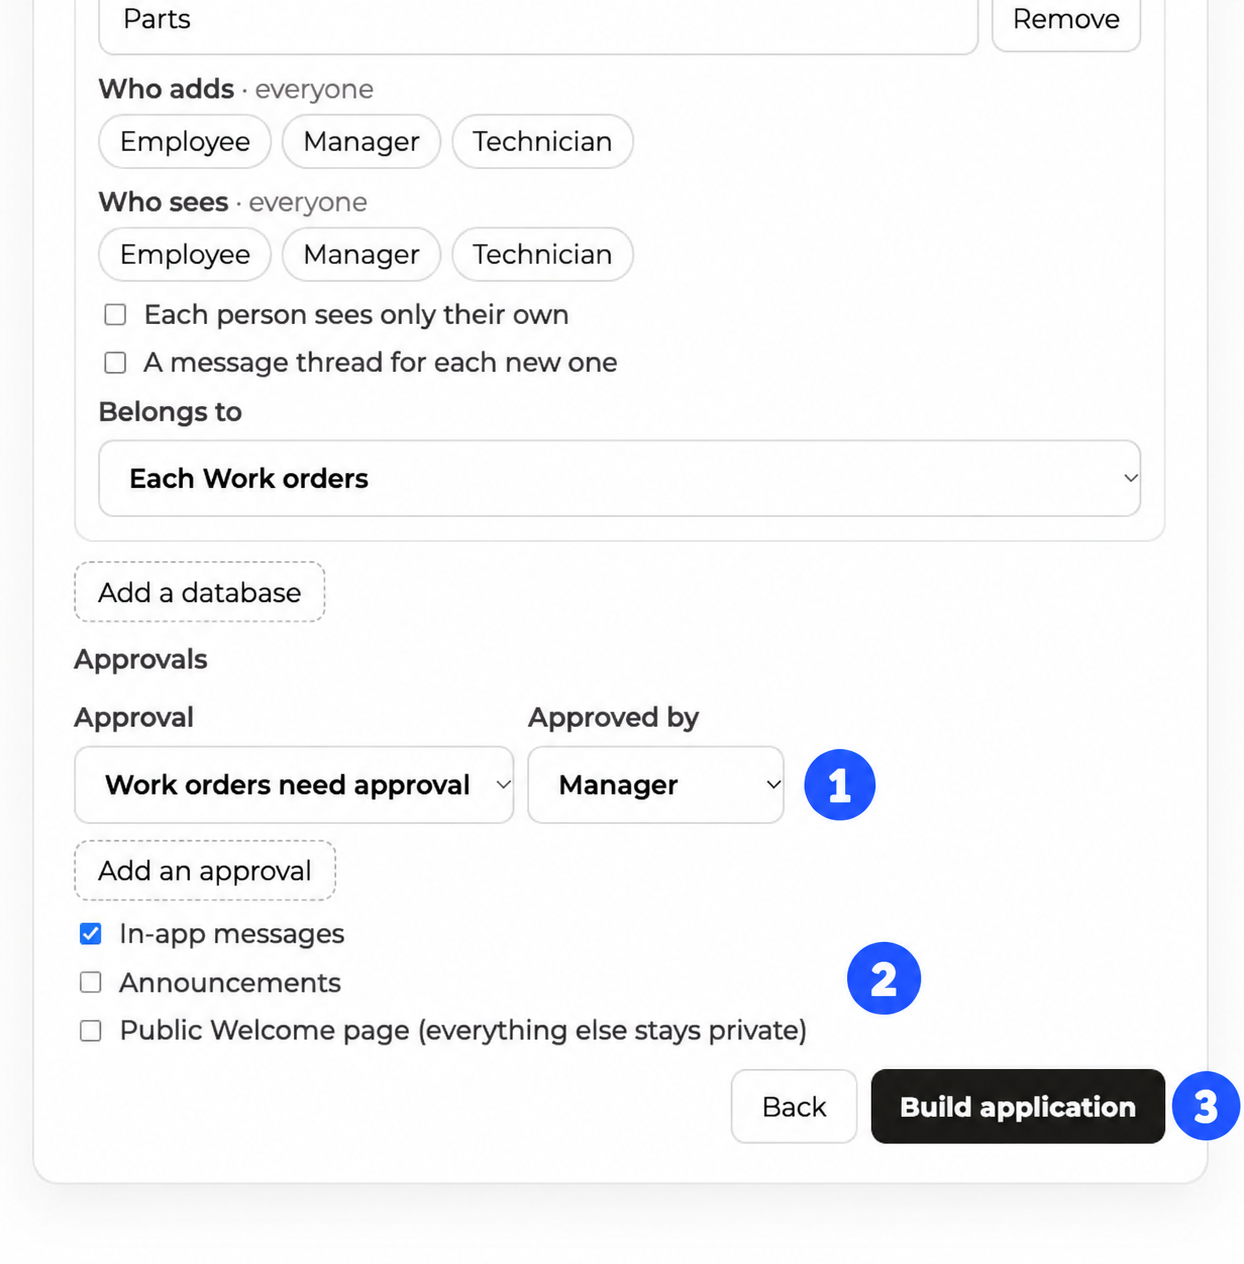
Screenshot callouts
- Approval and Approved by. Select the record and the responsible role. For Team Requests, choose Requests and Manager.
- Optional features. Review In-app messages, Announcements, and Public Welcome page separately. Turn on the features your first version needs.
- Build application. Starts creating the approved structure. Finish your review before using it.
Messages support communication inside the app. Announcements support shared updates. A message thread for each new record organizes a conversation around a particular record and the people named on it. These are different choices; include only the ones that serve your process.
A Public Welcome page allows visitors to open that page while the other app screens require sign-in. Review its heading, short description, and topic text. This option also supports a request-to-join flow: review Join Requests, its approving role, and the role requested by an applicant. Accepting a request creates a user with the requested role, so the approver must check that role before accepting. Open self-signup remains separate and is not enabled simply by adding the Welcome page.
If you only need an internal request tracker, leave the public-page option off for the first version.
Step 7 Build and read the result
Select Build application once. Keep the page open while the progress display reports the build steps. The tool creates the approved Notion structure and app configuration; the exact steps depend on the selected features.
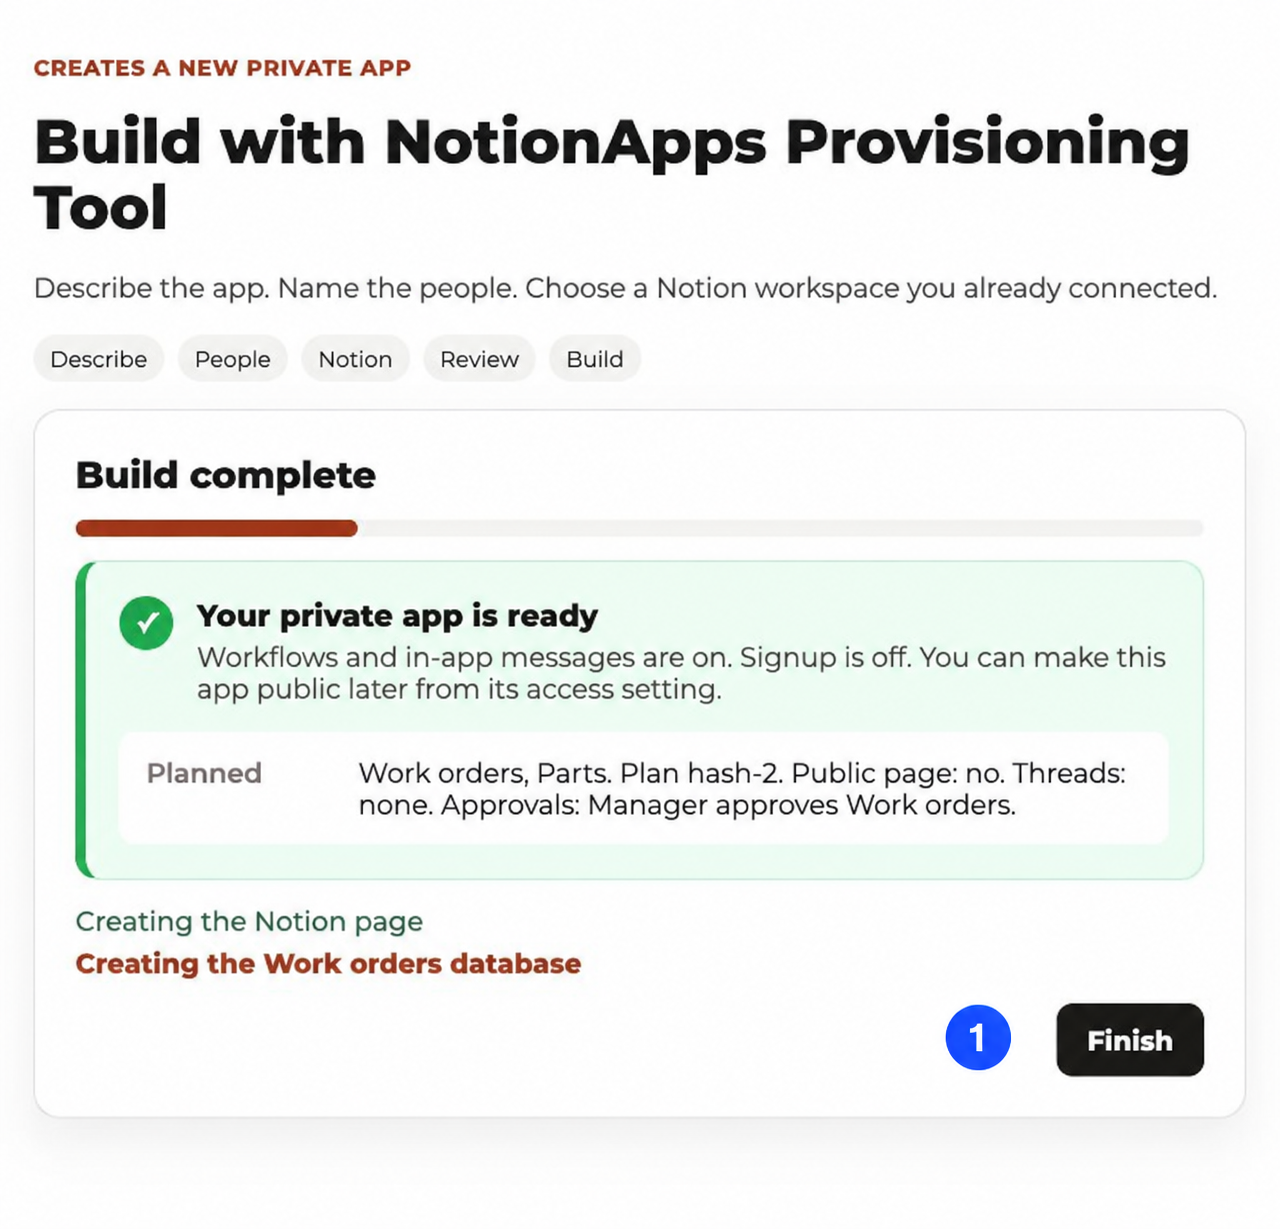
Screenshot callout
- Finish. Advances to the finished-build view. Use the app-opening link there to open the application in the builder.
Read the outcome message, not just the progress bar. A successful new-infrastructure run creates and publishes a private app, with the generated workflows and in-app messaging active where included. It is not merely an unpublished design preview.
If the result says The app was built, but not everything finished, an app may exist even though publishing, access setup, or another step failed. Read the reason before starting a second build. Review any Left out of this build items, and inspect invitation results. Use Resend invite or Reset password where the finished-build screen offers those controls.
Step 8 Open the app and test it
Open the app in the builder, inspect its screens and connected databases, and then test the actual app link with the intended sign-in method. Follow the testing section below before sending the link to your wider team.
Create an app from existing databases
Use this path when your data is already organized in Notion. The tool builds an app around the databases you select and can propose missing properties or additional databases.
This path can change Notion. Approved additions, a new Users database, or a Role property are real changes to the selected workspace. Inspect the proposed additions before creating the app.
Step 1 Select the workspace and databases
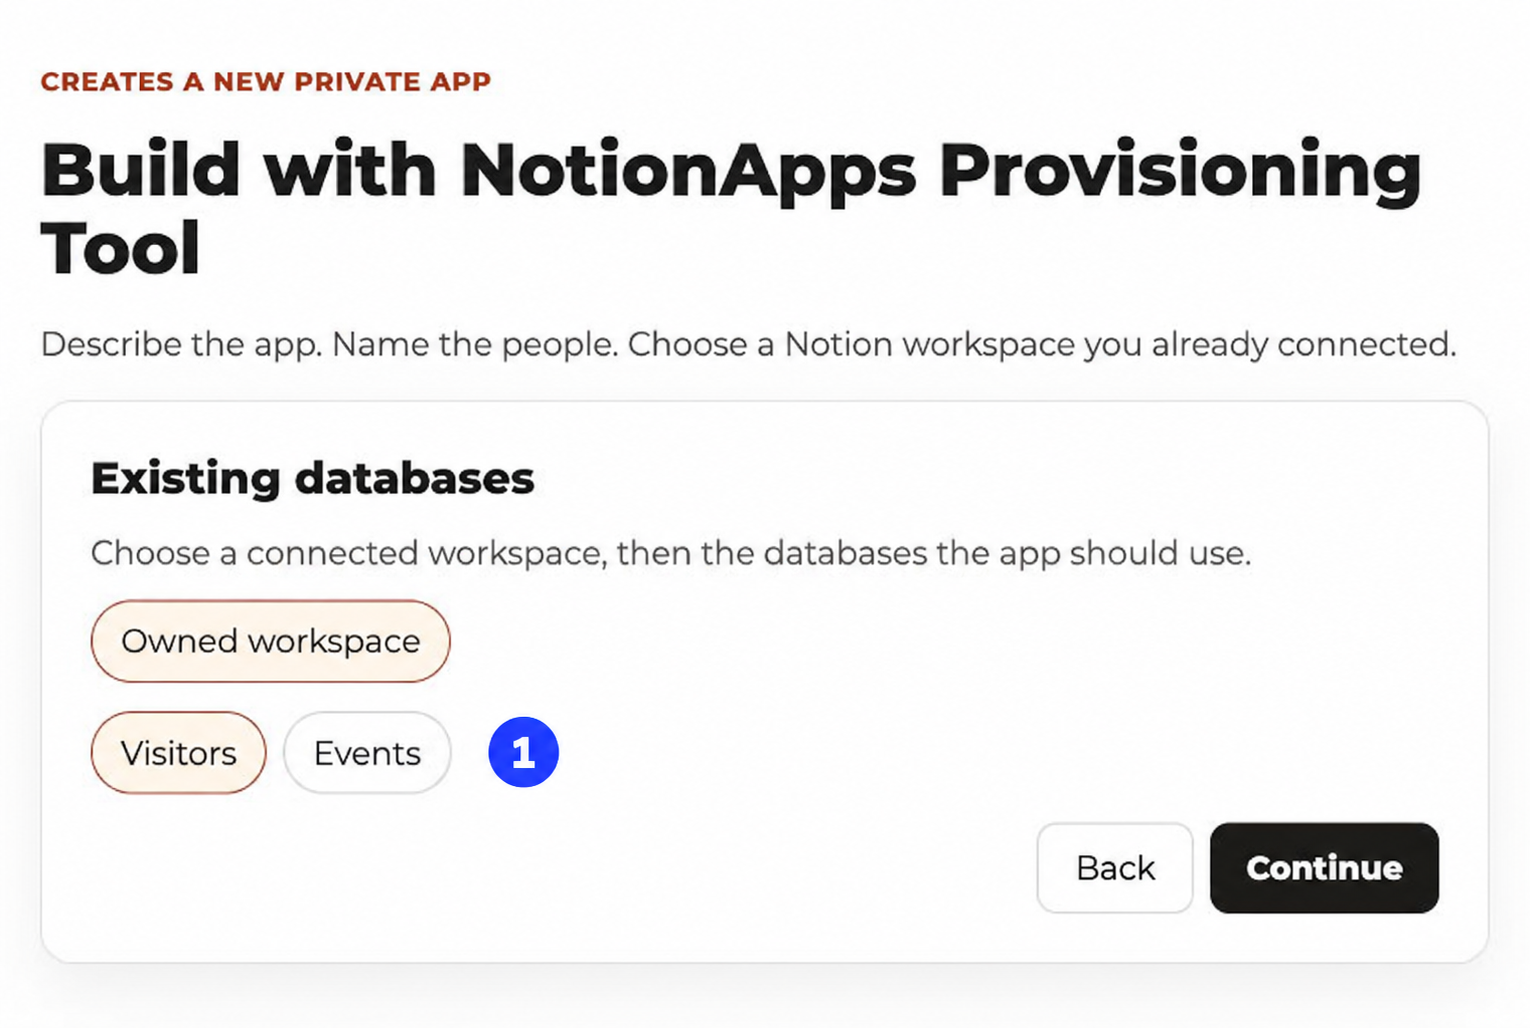
Choose Create an app from existing databases, select a connected workspace, and select each database that should be part of the app. Include the Users database if you already have one that the app should use.
Screenshot callout
- Database choices. Select the databases needed for the app. In the example, Visitors is selected and Events is not. Selecting a workspace alone is not enough.
Select Continue after choosing the databases. If one is missing, check that it is connected and accessible before proceeding with a partial selection.
Step 2 Describe how to use the selected data
In How do you want the application put together?, use the actual database names. For the illustrated Visitors database, you could write:
Build a private app called Visitor Requests using Visitors.
Roles: Host, Manager.
Hosts add Visitors and see only their own Visitors.
Managers see all Visitors and approve Visitors.
Hosts and Managers send in-app messages to each other.
Using the exact database name helps connect the business instructions to the selected data. If you ask for a record type that does not exist, the plan may propose an additional database.
Step 3 Choose private or public access
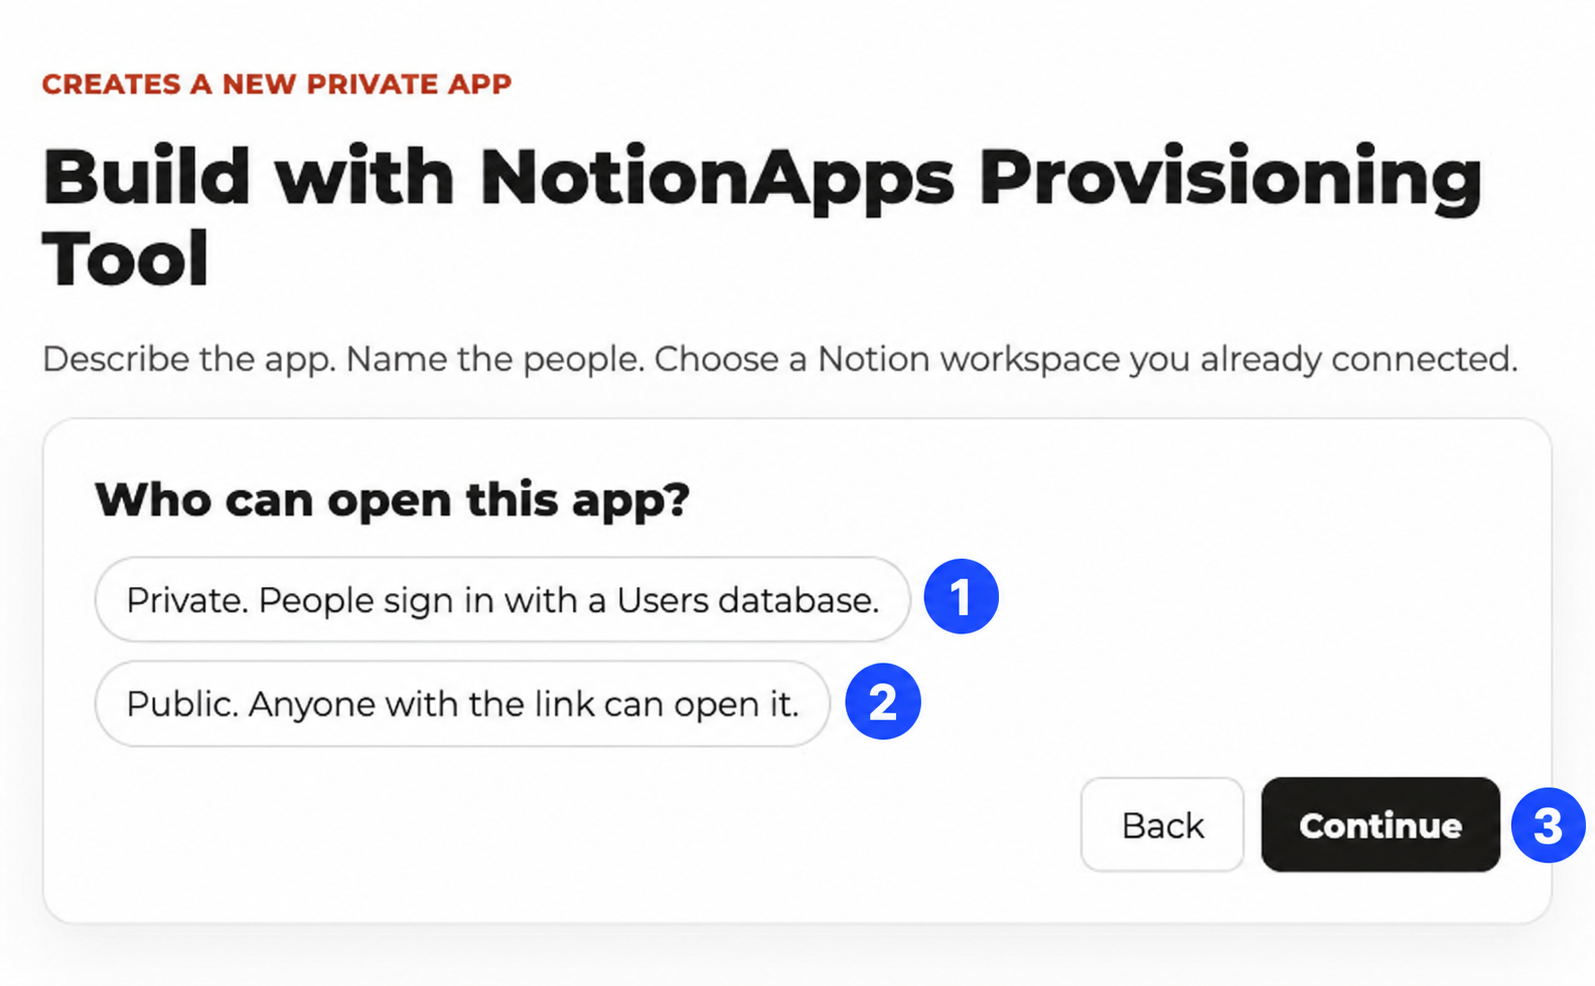
The existing-database path asks Who can open this app? Make this choice explicitly.
Screenshot callouts
- Private. People sign in through a Users database. Use this for personal records, role-based work, or any app whose audience must be identified.
- Public. Anyone with the link can open the app. Choose this only when that is the intended audience.
- Continue. Confirm the access choice and move to the next step.
For the Visitor Requests example, choose Private. An ownership rule such as “Hosts see only their own Visitors” depends on knowing who the signed-in user is.
Step 4 Supply a Users database if needed
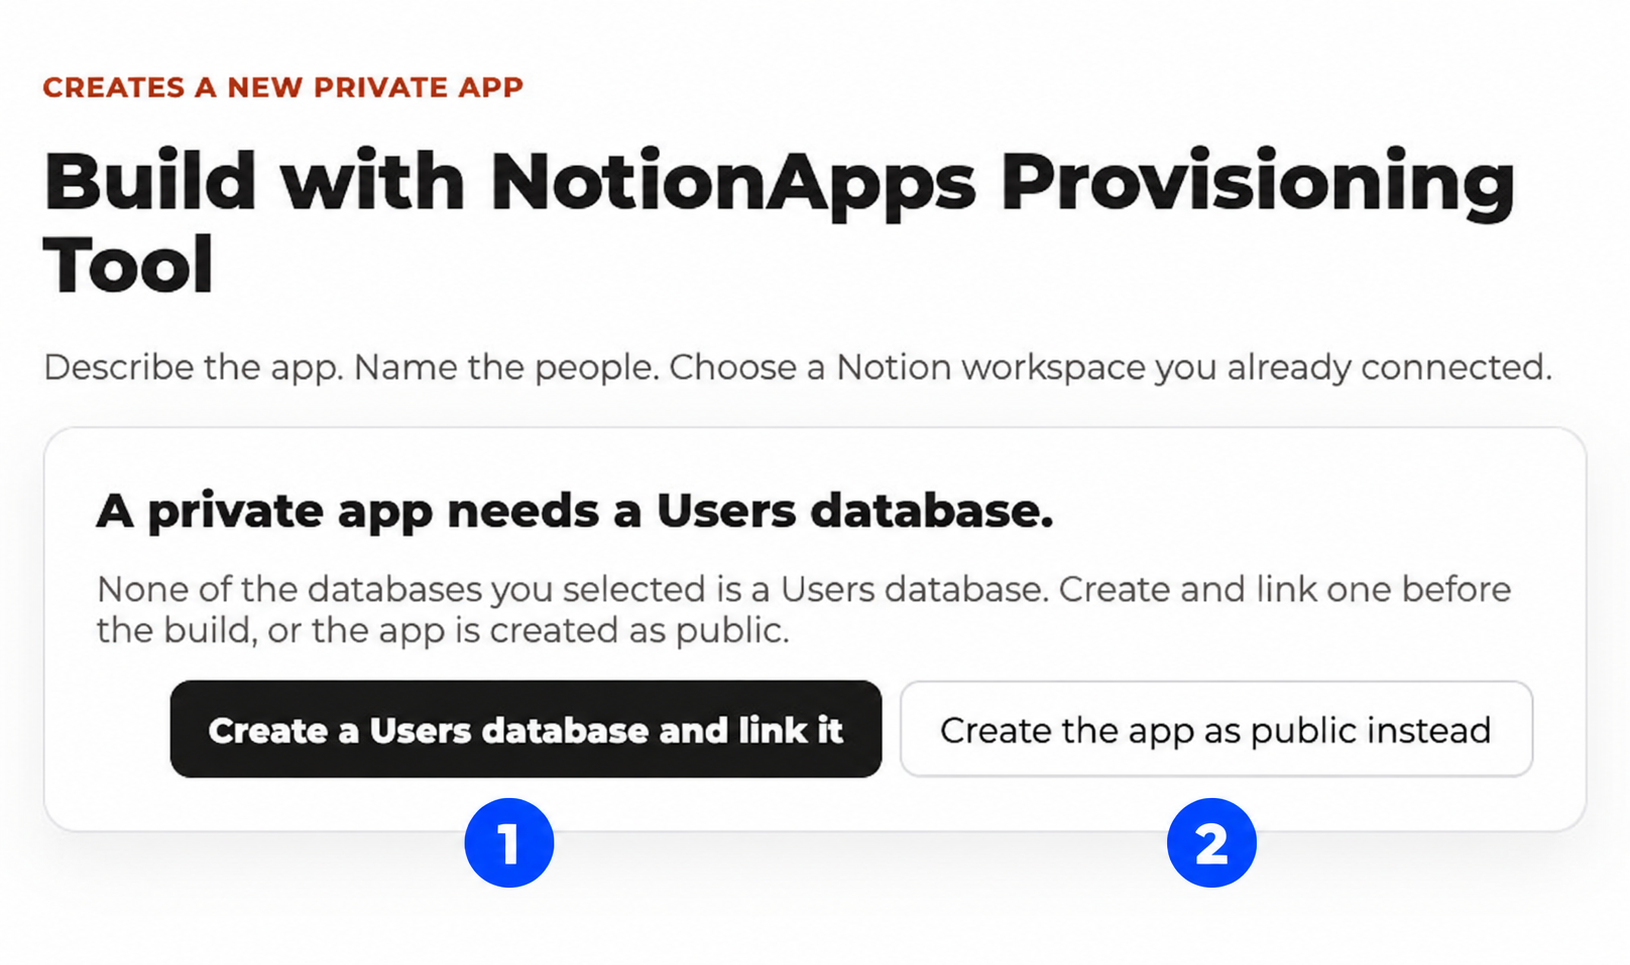
If none of the selected databases is recognized as a Users database, the private path asks you to create and link one.
Screenshot callouts
- Create a Users database and link it. Keeps the intended private setup. Choose its destination page and continue to roles.
- Create the app as public instead. Changes the intended access model. Do not use it merely to skip the Users database step.
The new Users database is created when you create the app. If you already have an appropriate Users database, go back and include it in the selection instead.
Step 5 Confirm roles and people
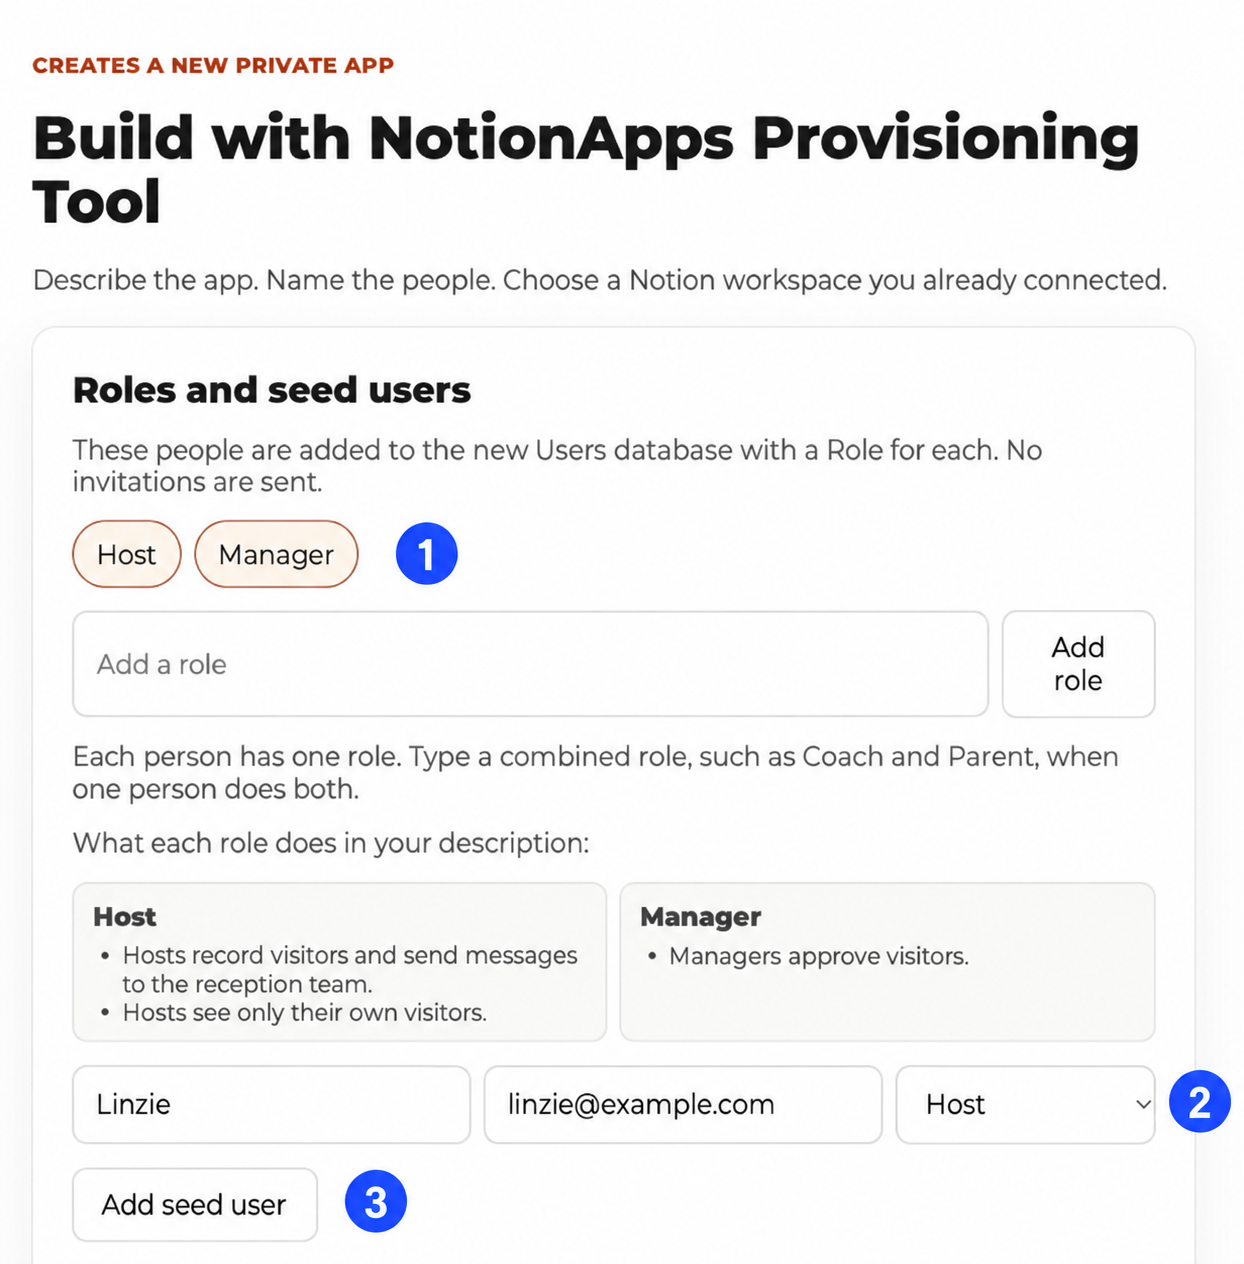
Confirm the roles and initial users. If the selected Users database needs a role field, review Add a Role property to the Users database in Notion before proceeding.
Screenshot callouts
- Roles. Confirm the roles used in your directive; add a missing role if necessary.
- Person's role. Assign one role to each person, including yourself.
- Add seed user. Add an initial user by name, email, and role.
Existing people in the selected Users database are preserved. The initial people you enter are added to the chosen or newly created Users database.
This path does not send invitations when it adds those people. Configure and test the app's intended sign-in method before sharing it. Do not wait for a password-setup email that this creation path does not send.
Step 6 Review the plan and proposed additions
The tool checks whether the selected databases cover the requested app. It may show Here is how the app will be built, or explain These databases do not cover that application.
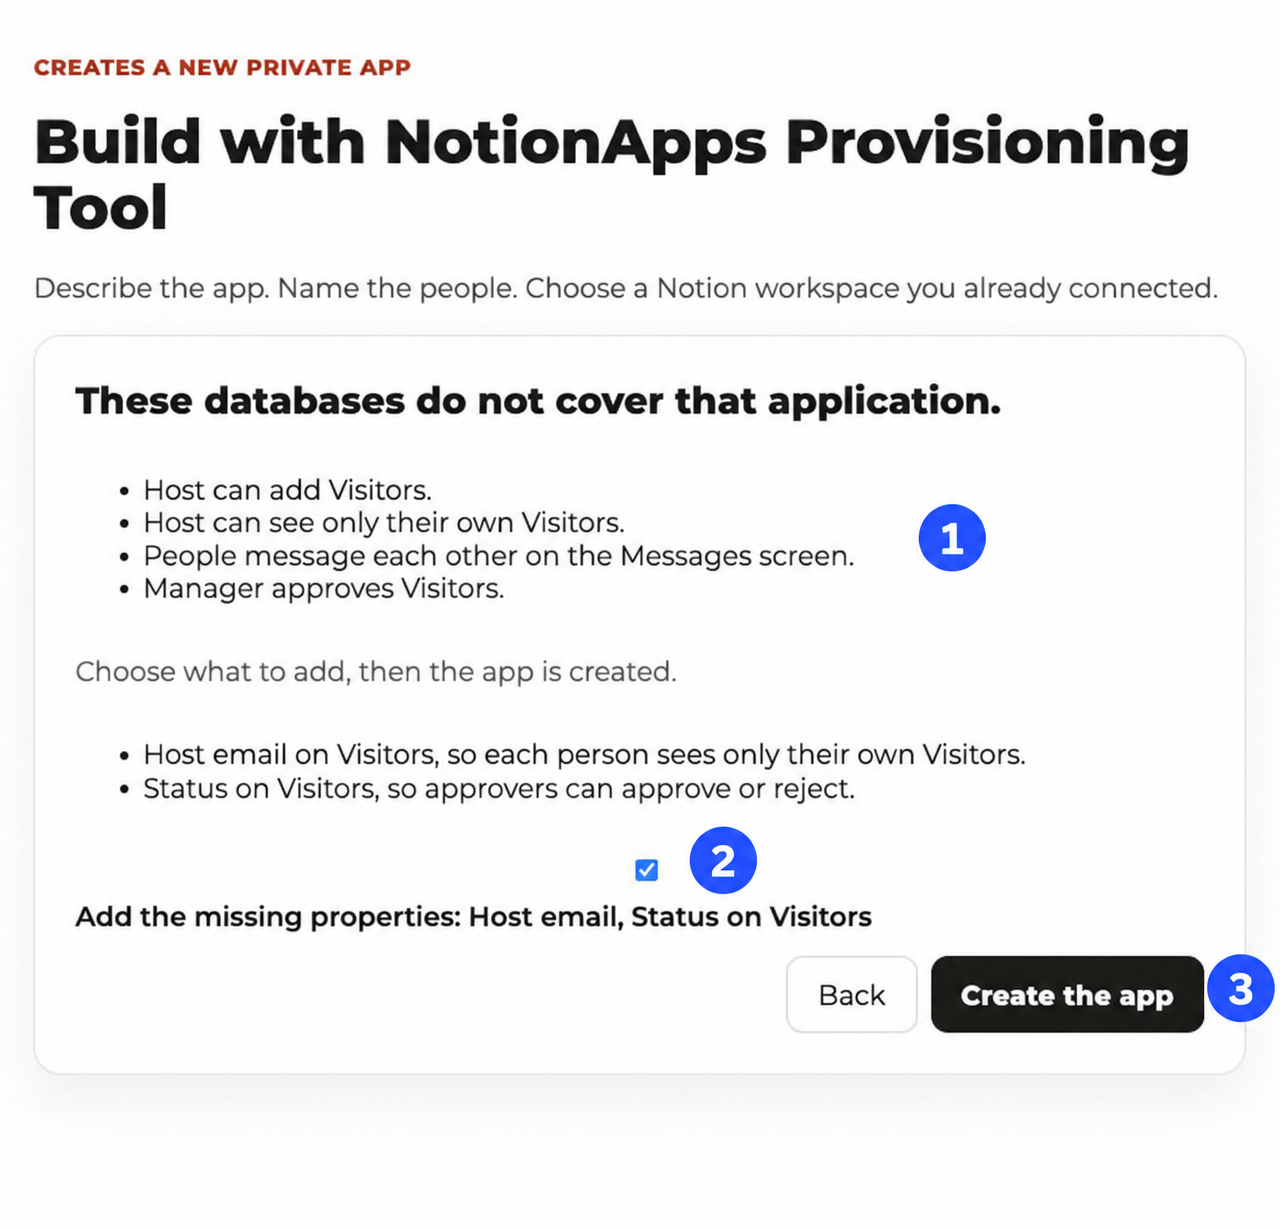
Screenshot callouts
- Behavior summary. Check the role, visibility, messaging, and approval statements against your directive.
- Add the missing properties. Read the proposed fields. In this example, Host email supports ownership matching and Status supports the approval process. The checkbox may already be selected.
- Create the app. Creates the app using the plan and additions you approved.
Review Add the missing databases if it appears. Keep only the additions that fit your intended structure. Removing a proposed addition can leave the requested behavior unsupported; if it is required, simplify the request or supply the missing structure before building.
When a review edit changes the plan, the action may become Update plan. Select it, read the refreshed plan and additions, and only then select Create the app.
Step 7 Create the app and verify existing records
Start creation and leave the page open while it runs. Open the result and check that the intended databases are linked. Verify that existing records appear correctly, that any additions have the intended types, and that private access works.
Older records may not yet contain the ownership or assignment values required by the new app. For example, adding a Host email property does not by itself identify which existing visitor belongs to which Host. Review and populate those values as appropriate, then test visibility with real test accounts.
Test and customize the finished app
Inspect the structure before adding more features
Open the app in the builder and inspect the connected databases, navigation, list screens, forms, details screens, and user settings. Look for missing records, confusing names, unnecessary screens, or fields that have the wrong type.
Make one small change at a time. For example, rename a screen, reorder its fields, or remove an unnecessary field from a form. This makes it easier to tell whether a later problem comes from the original build or a subsequent customization.
Test a complete user journey
Use a small number of clearly labeled test records. For Team Requests, test the following:
| Test | Action | Expected result |
|---|---|---|
| Sign-in | Open the private app link in a private browser window and sign in as Employee A. | The account can access its intended starting screen. |
| Create | Submit a Request called Printer repair test. | The request is saved with the intended fields and ownership. |
| Read | Reopen the request as Employee A. | Its details match what was submitted. |
| Separate users | Sign in as Employee B. | Employee B cannot see Employee A's private request. |
| Manager access | Sign in as the Manager. | The Manager can find the request intended for review. |
| Approve | Approve a test request. | The decision and resulting status are reflected as intended. |
| Reject | Submit a second test request and reject it. | The rejection path works and the requester sees the appropriate result. |
| Messaging | Send an in-app message between test participants. | The intended recipient can find and read it. |
| Direct access | Test a private record's link as a user who should not see it. | Access follows the intended restrictions, not merely the navigation layout. |
| Notion data | Open the connected test record in Notion. | The expected fields and changes are present after synchronization. |
If an expectation fails, fix the relevant permissions, fields, or workflow before adding real operational data. A hidden navigation tab alone is not evidence that the underlying record is inaccessible.
Use View as in the builder where available to inspect another user's experience, and also test the published app with separate accounts. Previewing a role and completing a real sign-in test answer different questions.
Check invitations and public access separately
For new-infrastructure builds, review which initial users received invitations and whether the result reported a failure. A user in the database is not the same thing as a user who successfully received and completed a password-setup link.
For existing-database builds, verify the sign-in method you configured and provide access through the app's normal user-management process.
If you enabled a public Welcome page, test it while signed out. Confirm that it shows the intended public text and that other screens still require sign-in. Test a request to join, its approval, and the role assigned to the accepted applicant before promoting that page.
Publish later changes and share the correct link
The new-infrastructure build attempts to publish the generated private app as part of completion. Later edits in the builder still need the normal publishing step to reach app users. A successful save in the builder is not the same as publishing the changed app.
After your checks pass, publish any later changes and test the app link in a fresh browser session. Share the end-user app link with your team rather than the maker's builder URL. Use the First-app publish checklist for the standard publish-and-share steps.
Try these directive examples
These are starting directives to adapt and review, not fixed templates with guaranteed identical results. Each example includes a suggested creation path, the reason for its structure, and checks to perform before accepting the plan. The generated plan and completed-build report determine what was actually included.
Example 1 Team requests with manager approval
Best for: A first app with one submission and one decision. Path: New infrastructure.
Build a private app called Team Requests.
Roles: Employee, Manager.
Employees submit Requests.
Each Request has a Summary, Needed by date, and Estimated cost.
Employees see only their own Requests.
Managers see all Requests and approve Requests.
Employees and Managers send in-app messages to each other.
Why it works: It names one record type consistently and separates submission, visibility, and approval. The field list adds useful business detail without asking for a large data model.
Review: Requests, the three additional fields, Employee ownership, Manager visibility, Manager approval, and in-app messages. Confirm the number and date field types.
Test: Employee A submits a request; Employee B cannot see it; the Manager approves it. This is the recommended first example because the acceptance checks are easy to observe.
Example 2 Project tasks with a parent relationship
Best for: Understanding how two databases connect. Path: New infrastructure.
Build a private app called Project Tasks.
Roles: Project Manager, Team Member.
Project Managers create Projects.
Each Project has a Start date and Target date.
Project Managers create Tasks for each Project and assign Tasks to Team Members.
Each Task has a Due date and Estimated hours.
Team Members see only Tasks assigned to them and update their assigned Tasks.
Project Managers see all Projects and Tasks.
Project Managers and Team Members send in-app messages to each other.
Why it works: “For each Project” expresses the parent-child relationship. Assignment is named separately from creation, so the person who creates a task is not automatically assumed to be the person doing it.
Review: Separate Projects and Tasks databases, the Task-to-Project relationship, an assignment field, the intended update controls, and Team Member visibility. Check how Projects themselves should be visible to Team Members; clarify that in the plan if the default does not fit.
Test: Create two tasks for the same project and assign them to different team members. Each person should find the right task and be able to perform only the intended actions.
Example 3 Expense request approval
Best for: A request that contains an amount and needs a decision. Path: New infrastructure.
Build a private app called Expense Requests.
Roles: Employee, Finance Manager.
Employees submit Expense Requests.
Each Expense Request has an Expense date, Amount, Merchant, and Business purpose.
Employees see only their own Expense Requests.
Finance Managers see all Expense Requests and approve Expense Requests.
Employees and Finance Managers send in-app messages to each other.
Why it works: It explicitly asks for request approval, without implying that approving a record makes a payment. The record fields are concrete and simple.
Review: Amount as a number, Expense date as a date, the remaining fields as text, and the correct approval role. Add a Currency text field if your process needs one.
Test: Submit one request to approve and one to reject. Verify ownership and both outcomes. This directive tracks approval; it does not reimburse an employee, connect a bank, or automatically collect receipt uploads.
Example 4 Work orders with related parts and conversations
Best for: Field operations with a child record and a record-specific discussion. Path: New infrastructure.
Build a private app called Maintenance Desk.
Roles: Coordinator, Technician.
Coordinators create Work Orders and assign Work Orders to Technicians.
Each Work Order has a Site address and Due date.
Technicians see only Work Orders assigned to them and update those Work Orders.
Coordinators see all Work Orders.
Technicians add Parts for each Work Order.
Each Part has a Part name, Quantity, and Unit cost.
Create a message thread for each new Work Order for the people named on it.
Why it works: The relationship, assignment, and conversation are expressed as separate instructions. Parts belong to a work order instead of becoming an unrelated list.
Review: Work Orders and Parts, the parent relation, number fields for Quantity and Unit cost, assignment, update controls, and the record-thread option. Explicitly inspect Parts visibility as well as Work Order visibility; do not assume one automatically secures the other.
Test: Assign a work order, add a part, and check that the right participants can find its message thread. Keep automatic inventory deductions and calculated totals out of this first version; configure and test those separately if required.
Example 5 A simple team bug tracker
Best for: A shared internal list with different responsibilities. Path: New infrastructure.
Build a private app called Team Bug Tracker.
Roles: Tester, Developer, Product Manager.
Testers submit Bugs.
Each Bug has Steps to reproduce, Expected result, Actual result, and Reported date.
Developers update Bugs assigned to them.
Testers, Developers, and Product Managers see all Bugs.
Product Managers post announcements.
Testers, Developers, and Product Managers send in-app messages to each other.
Why it works: Shared visibility is intentional and stated explicitly. The directive does not accidentally imply that every private app should restrict users to their own records.
Review: Bugs, the reproduction fields, an assignment control, developer update behavior, and the intended announcement authoring permissions.
Test: A Tester submits a bug, a Developer updates the assigned bug, and the Product Manager posts an announcement. Check that visibility is shared without granting unintended edit or delete actions.
Example 6 Assignments and student submissions
Best for: Learning content with private responses. Path: New infrastructure.
Build a private app called Class Submissions.
Roles: Teacher, Student.
Teachers create Assignments with Instructions and a Due date.
Teachers and Students see all Assignments.
Students submit Responses for each Assignment.
Each Response has Answer text and a Submitted date.
Students see only their own Responses.
Teachers see all Responses and approve Responses.
Teachers post announcements for Students.
Why it works: Assignments are shared while Responses are private. Separating those databases avoids trying to apply two incompatible visibility rules to the same type of record.
Review: The Response-to-Assignment relationship, student ownership, teacher access, and the intended approval terminology. Decide whether “approval” is really the outcome your process needs; it is not automatically a grading system.
Test: Two students submit responses to one assignment. Each should see the assignment and their own response, while the Teacher can review both. This version uses text responses rather than file uploads.
Example 7 A member portal with a public Welcome page
Best for: Public introductory information leading into a private member area. Path: New infrastructure.
Build a private app called Community Hub.
Roles: Member, Coordinator.
Members submit Requests with a Subject and Preferred date.
Members see only their own Requests.
Coordinators see all Requests and approve Requests.
Coordinators post announcements for Members.
Members and Coordinators send in-app messages to each other.
Include a public Welcome page with sections called About the community,
How membership works, and Contact us. Everything else requires sign-in.
Coordinators approve Join Requests.
Why it works: It distinguishes public information from private member records, and names who should handle membership decisions.
Review: Public-page text, private record access, Join Requests, the Coordinator approval role, announcements, and messaging. Replace generic public text with your actual community information before sharing it.
Test: Open the Welcome page while signed out, submit a test join request, and inspect the requested role before approving it. Confirm that the accepted user has the intended role and access. A public Welcome page is not permission to view all member records.
Example 8 Visitor requests using existing data
Best for: A team that already has a Visitors database. Path: Existing databases.
Build a private app called Visitor Requests using the selected Visitors database.
Roles: Host, Manager.
Hosts add Visitors and see only their own Visitors.
Managers see all Visitors and approve Visitors.
Hosts and Managers send in-app messages to each other.
Why it works: It uses the exact source database name and gives the tool the business rules needed to propose missing structure.
Review: Select Visitors and the appropriate Users database, choose Private, and inspect any proposed Host email, Status, Role, or additional database changes. If your actual database is called Visitor Log, replace Visitors consistently in the directive.
Test: Populate the ownership field on representative existing records, then sign in as two Hosts and a Manager. Check old records as well as a newly submitted visitor. Remember that this path does not automatically email invitations to the initial users.
Follow these best practices
Keep the first version small
Start with one or two business databases, two or three roles, and one complete user journey. Add optional communications or a public page only when you understand how they fit. This makes the generated plan easier to review and the finished app easier to test.
Use the same names throughout
If the record is called Requests, avoid alternating between Tickets, Cases, and Submissions unless they are genuinely different records. Likewise, choose Manager or Supervisor and use it consistently. In the existing-data flow, match actual database names.
Write one responsibility per sentence
“Employees submit Requests. Managers approve Requests. Technicians update assigned Work Orders.” is easier to interpret and review than one long sentence using several occurrences of “they” and “them.” Repeat the role or record name when a pronoun could be ambiguous.
Separate access from actions
Say who can add, see, update, and approve. Someone who can see all records may not need permission to create or edit all of them. The plan has explicit controls for some of these decisions; inspect the generated screen actions for the rest.
Define what own records means
“Their own” might mean submitted by them, assigned to them, or associated with their customer account. State the intended relationship. Check the generated owner or assignment field and test it with two different users. Avoid relying on app-wide privacy to isolate one user's records from another's.
Name the approver and the record
Use “Finance Managers approve Expense Requests,” not just “include approvals.” Confirm that someone in the initial user list has that role. If your process requires sequential reviews, amount thresholds, escalation, or a schedule, inspect and configure those requirements separately rather than assuming a simple approval row implements them.
Review fields for meaning and type
Use dates for dates and numbers for quantities. A field called Status is not by itself a complete workflow. A field called Owner does not prove that ownership filtering is configured. Review the plan and then test the behavior.
Keep external actions separate
Ask for in-app messages when that is what you need. Do not treat “notify” as a guarantee of email, SMS, or a connection to another service. Keep integrations and scheduled external delivery as separate configuration tasks after the basic app works.
Use the review controls to correct the interpretation
Do not keep adding contradictory instructions to the description. Correct a record name, a role selection, an approval, or a feature directly in the review where possible. If you change the underlying process, revise the description and review the resulting plan again.
Check optional additions individually
An existing database may need an ownership field, a Status property, or a Users database. Understand the reason for each addition. Leave unnecessary changes out, but do not accept a missing foundation for a behavior your app depends on.
Treat the maker as an app user during testing
Your maker access lets you configure the app. Your selected app-user role determines the experience you are testing inside it. Use separate role accounts when verifying restrictions instead of testing everything only as yourself.
Read omissions and partial failures
An app may be created while another step fails. A directive may be accepted while a requested feature is left out. Keep the completion report, resolve the specific issue, and inspect any already-created app before launching another build.
Keep a record of the accepted design
Save the final directive and a short note of the changes you made during review. For example: “Renamed Requests to Service Requests; changed approver to Operations Manager; removed Announcements.” This gives you a useful reference when customizing the app or asking support for help.
Repair tab labels on an existing app
The third action in the Provisioning Tool repairs tab labels on an app that already exists. Use it when navigation labels are too long or need the proposed shortening, rather than creating another application.
- Open the Provisioning Tool and select Fix tab labels on an existing app.
- Choose the correct app from your account's list. Check both its name and identifying route if several names are similar.
- Preview the proposed renames. The preview does not write changes.
- Review each old and new label. If a protected app requires an explicit selection, make that selection only for the intended app.
- Confirm the changes if they are correct.
- Open the app and check the navigation labels.
If the result says the labels are already short enough, there may be nothing to change. This tool does not change the underlying business process, rebuild databases, or turn an existing app into a new directive-generated app.
Troubleshoot common problems
| What you see | What it means or what to check | Next action |
|---|---|---|
| Provisioning Tool is off or unavailable | The feature is not available in the current account or environment. | Check account access and contact support if you expected it to be enabled. |
| Requires a subscription | The account does not currently have the required provisioning access. | Review the plan and feature access shown in the app. |
| No connected workspace | Notion has not been connected for this account. | Return to the home page, connect Notion, and reopen the tool. |
| No destination pages | The connection may not have page access, or the search may hide the result. | Check sharing, the selected workspace, and the search text; refresh the selection. |
| An existing database is missing | The selected workspace or integration access may be wrong. | Verify the source database is connected and accessible before creating a partial app. |
| Continue is unavailable on the people step | A required name, email, role, or role list may be incomplete. | Complete each person and assign one confirmed role. |
| No suitable approving role | The role is missing or has not been selected. | Confirm the role and a corresponding test user, then select it for the approval. |
| The proposed databases are wrong | The directive was interpreted differently from your intent. | Correct the review or simplify the description with consistent record names. |
| Everyone appears in an access label | An unselected role list can mean unrestricted role access. | Choose the intended roles and ownership option, then test separate accounts. |
| The AI reader is unavailable | The plan may have been produced without the normal AI reading. | Review every interpretation and any stated questions or omissions before proceeding. |
| These databases do not cover that application | Required structure is missing from the selected sources. | Review the proposed additions, choose more suitable databases, or reduce the requested scope. |
| Update plan appears | Your edits have not yet been reflected in a fresh plan. | Update, review the new additions, then create the app. |
| A private app needs a Users database | There is no selected, recognized Users database for sign-in. | Create and link one or select your existing Users database. |
| A person can sign in but sees no records | The role, screen visibility, ownership value, or assignment may not match. | Compare the user's role and email with a representative record and its visibility rules. |
| Old records disappear from a person's view | Newly added ownership fields may be empty on old data. | Review and populate the intended ownership values; retest with two users. |
| No invitation arrives after an existing-data build | That path adds users without sending invitations. | Configure the intended login method and use normal access setup. |
| A new-infrastructure invitation fails | App creation and email delivery may have different outcomes. | Read the failure, verify the address, and use available resend or reset controls. |
| The app was built but not everything finished | An app may exist while another step failed. | Inspect the report and existing app before rebuilding. |
| A requested feature is left out | The feature may be unsupported or exceed the build's scope. | Simplify the plan or configure the feature separately after creation. |
| Later builder edits are missing in the app | The changes may not have been published. | Publish and test the app link in a fresh session. |
For a support request, include the creation path, the exact visible error, the stage where it happened, the app name or link if one exists, and a screenshot of the relevant result. Include the directive when it helps explain a planning problem, after removing any private information that support does not need. Keep passwords and password-reset links out of the request.
Questions and answers
Do I need to know how to code?
No. Describe the business process in ordinary language and use the review controls to confirm it. You should understand who uses the app and what those people are allowed to do.
Do I need to understand Notion databases first?
You need the basic distinction between a database, a record, and a property. A database stores one kind of information; a record is one item; a property is a field on that item. The new-infrastructure path creates the starting structure for you.
Do I need to create all the databases before using the tool?
No. Choose Create a new app and its Notion infrastructure if they do not exist. Choose Create an app from existing databases if you already have the data.
What is a directive?
A directive is the description of what you want the app to do. It should name the roles, records, actions, visibility rules, and any approvals or communication features. It does not need code or a special formatting language.
How long should my directive be?
Long enough to define the process, but short enough to review without contradictions. A focused first app can often be described in a short paragraph or several direct sentences. Add detail when it answers a concrete question about data or responsibility.
Can I paste one of the examples unchanged?
You can use an example as a starting point, but adapt its names, responsibilities, and access rules to your process. Confirm the roles and people in the form and inspect the generated plan. The examples are not promises of an identical prebuilt application.
Can I put people's names and emails in the directive?
Use the Roles and seed users form for the actual initial users. Keep the directive focused on responsibilities. A person's name appearing in prose is not a substitute for adding and confirming that person's user entry.
Can one person have two roles?
This setup assigns one role per person. Create and describe a combined role when needed, then assign that role. Review its access explicitly rather than assuming it automatically combines all permissions from two other roles.
Why does my own role matter if I created the app?
Maker access and app-user access serve different purposes. You configure the app as its maker, but use the finished private app through your assigned user role. If you need to test an approval, sign in as the approving role.
Can I choose where the new Notion databases are created?
Yes. Choose an accessible page in the connected workspace, or create a named page inside an accessible parent page. Read the destination confirmation before building.
Why can I see a page in Notion but not in the tool?
Your own Notion access and the NotionApps connection's access can differ. Check that the page is shared with the connection, that the correct workspace is selected, and that the search is not excluding it.
Does reviewing a plan create the databases?
The new-infrastructure review is a proposal. Creation begins when you choose Build application. In the existing-data path, review the selected additions before choosing Create the app.
Can I change the proposed plan?
Yes. Review controls cover record names, role access, ownership, relationships, approvals, messaging, announcements, and public-page choices. New-database field controls let you add supported fields. Names of existing source databases can be locked in this review. If the existing-data action changes to Update plan, use it and inspect the refreshed proposal before creating.
Will every request in my directive be built?
No. Read the plan, clarification questions, and any Not included or Left out of this build messages. Correct the scope or plan before relying on a requested behavior.
Does private mean each user sees only their own records?
No. Private means sign-in is required. Record visibility still depends on the configured roles and ownership or assignment rules. Test two users with different records to verify the intended separation.
Can I make just the Welcome page public?
Yes, through the Public Welcome page option. The other app screens remain subject to sign-in. Review the public text and the request-to-join setup, then test both the signed-out and signed-in experiences.
Does a public Welcome page enable open signup?
No. The request-to-join flow is approval-based. An approver reviews an application and its requested role before accepting it. Do not confuse a public introductory page with unrestricted access to the rest of the app.
Are invitations sent automatically?
The new-infrastructure path can send password-setup invitations to the initial users when the app is successfully prepared and published; inspect the completed result for failures. The existing-database path adds initial users without sending those invitations.
Will the tool send email or SMS notifications from my workflow?
Do not assume so. In-app messaging is distinct from external delivery. Email, SMS, and webhook automation are not configured simply by mentioning them in this provisioning directive. Password-setup invitations are a separate access feature.
Can it create formulas, rollups, or file-upload fields?
Those generated field types are not supported by this provisioning path. Use supported fields for the first build, then configure additional Notion or builder capabilities separately where available. This limitation does not mean every such field is unsupported throughout NotionApps.
Can I use databases that already contain records?
Yes. Select the existing databases and review any proposed additions. Test representative older records as well as new ones, especially if ownership, assignment, or role fields have just been added.
Does using existing databases make a separate copy of my data?
No automatic copy should be assumed. This path uses the selected databases and can add approved structure to them. Choose a separate test copy yourself if you want to experiment away from the live data.
Why is the tool asking to add Host email or another ownership field?
It needs a way to connect records to users for the requested visibility rule. Review the proposed field and how it will be populated. Existing records may need their ownership values filled in before the rule produces the intended result.
Can I create several approvals?
The review supports multiple approval entries for records. Verify each record and approving role. Multiple entries do not automatically mean a sequential approval chain, threshold-based routing, or escalation; configure and test those requirements separately.
Are there limits to how much I should build at once?
Yes. Builds and accounts have limits, and supporting features consume part of the available structure. Start with a focused process and read any limit or omission messages. Adding messaging, announcements, or membership requests can require additional objects beyond the business databases you named.
What should I do if the build fails?
Read the exact outcome. Use Back to review when available to correct the plan. If the app was created but another step failed, inspect that app and the report before starting over. Repeatedly rebuilding without checking can leave you with more than one app or partial structure.
Can I edit the finished app normally?
Yes. Open it in the builder and customize its screens, fields, navigation, access, and supported automation. Test after meaningful changes and publish later builder edits so users receive them.
Is the generated app already published?
A successful new-infrastructure build attempts to publish the private app as part of completion. Read the final outcome to confirm publishing succeeded. This does not remove the need to test access and behavior, and later builder changes still need publishing.
Can I use a new directive to redesign an existing app?
The two creation paths described here create an app. The separate existing-app action repairs tab labels. Do not assume that submitting another creation directive updates your existing app in place; use the builder to modify that app.
How do I know the app is ready for my team?
You have checked the connected data, tested sign-in with each role, verified record separation with different users, exercised every required form and approval outcome, checked messaging and any public page, and resolved omissions or partial failures. Then publish any later changes, test the app link once more, and share it with your intended users.