Create an app
Create an app from your Notion data, describe an app and let the provisioning tool build its starting structure, or begin with a copy of a template or an existing app.
Start on a laptop or desktop at notionapps.com. You can sign in on a phone, but app creation requires a larger screen.
Prefer to follow along? Watch the complete create-an-app tutorial.
Blue numbered markers on each screenshot match the instructions immediately below it. Numbering starts again at 1 for each screenshot.
Choose the right starting point
Your starting point | Use this path | What it creates |
|---|---|---|
You have databases and want to design the screens yourself. | An app connected to your selected databases, ready for you to add screens and components. | |
You want new databases and generated screens. | New Notion databases and an app based on your description and reviewed plan. | |
Your databases already exist and you want generated screens. | An app using your data, plus the additions you approve. | |
A finished example is close to what you need. | A copy of the template data and an app connected to that copy. | |
You want another version of an app you already own. | A copy of that app in the same connected workspace. |
Plan requirement: Paths 2 and 3 use Create using automation and require a paid subscription. The other creation methods do not require that provisioning feature, but account limits and template features can still affect availability. See Plans and entitlements.
Before you create an app: connect Notion
Sign up or sign in, then open My Apps.
If you see Action required, select Connect Notion. If the status is Lost Access, select Reconnect Notion instead.
In the Notion window, choose the workspace that contains your databases—or the workspace where you want new databases created.
Share the pages NotionApps should use. Sharing a parent page also makes the databases inside it available.
Approve access and return to My Apps. Confirm the connected workspace is the one you intend to use.
If you need a different workspace, open Settings → Manage Workspaces → Connect New Workspace, complete the connection, and switch to it before creating the app.
Important — workspace access and page access are separate: A connected workspace does not mean every page in it is shared. If a page or database is missing, use Manage Databases to share it, then return to the creation step. Allow one or two minutes for newly connected data to appear.
Popup blocked? Allow popups for NotionApps, then select Connect Notion again.
For the complete permission setup, see Connect Notion.
Open the creation options
On My Apps, select + Create New App. The Create New App screen asks how you want to start.
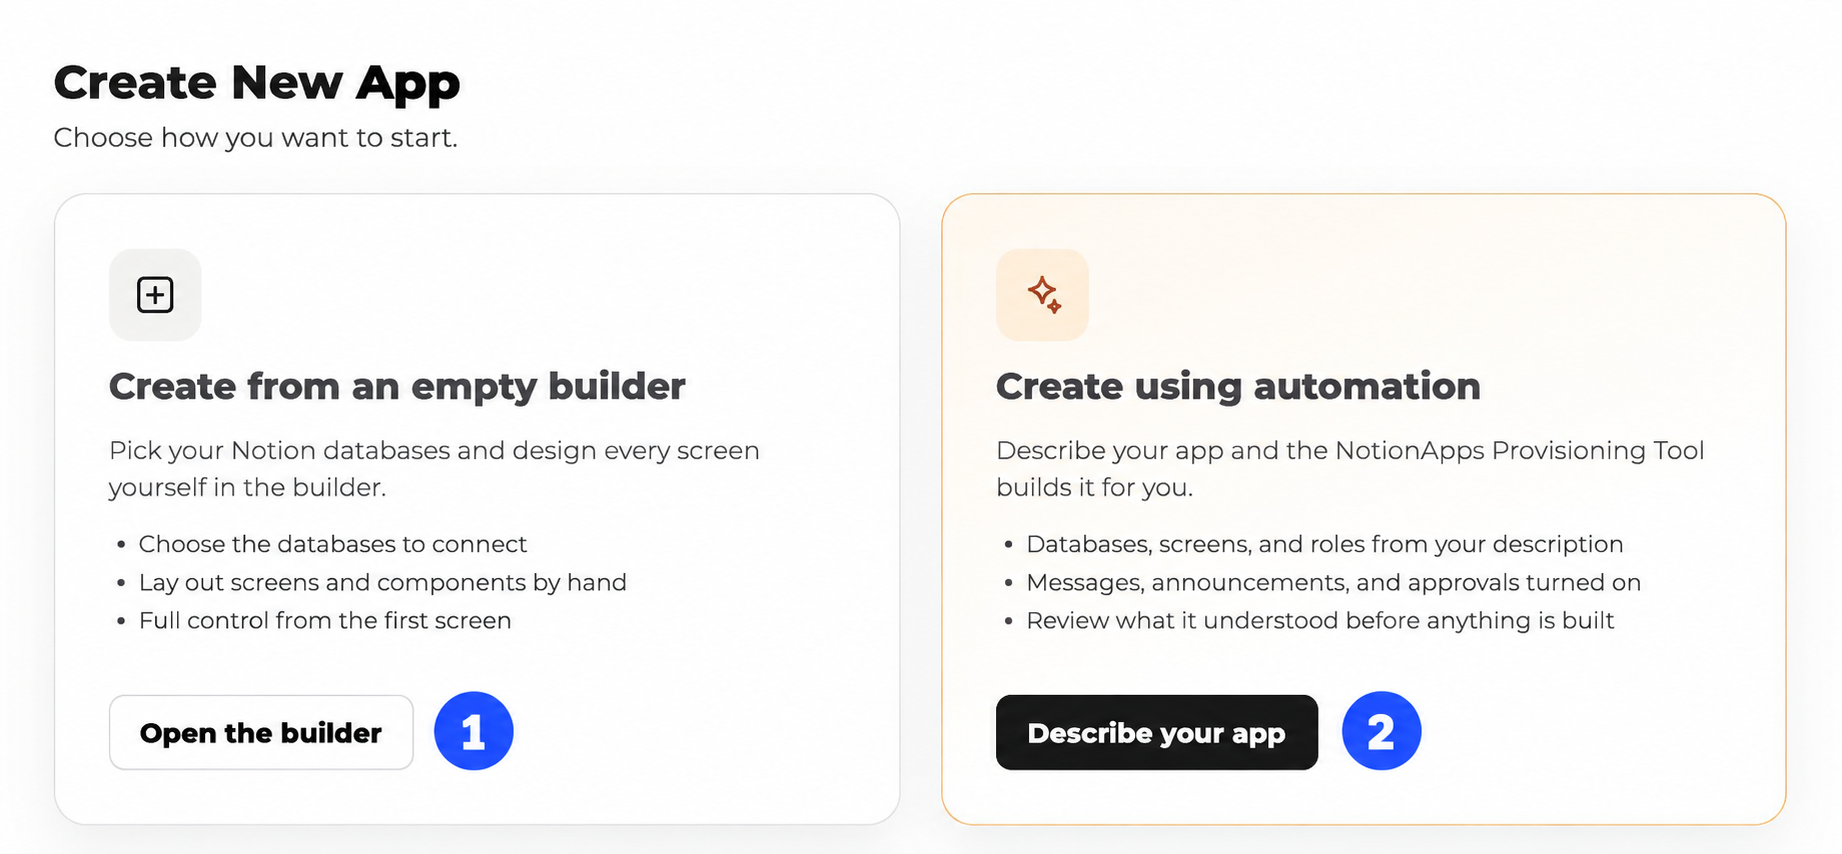
Screenshot callouts
Left card — Open the builder: Connect existing databases, then design the screens yourself.
Right card — Describe your app: Open the NotionApps Provisioning Tool to create the starting structure from a description.
Automation unavailable? If the card says Requires a subscription, it cannot be opened on the current plan. Use the empty builder, explore templates, or change your subscription.
Path 1: Start from an empty builder
Use this path when your Notion databases already exist and you want to control the screen design.
Select Create from an empty builder → Open the builder.
In Search your database name, enter at least two characters.
Select every database the app should use. You must select at least one.
Check the selected databases, then select Build App.
Wait for App created successfully and the builder to open.
Add your screens and place the components on them.
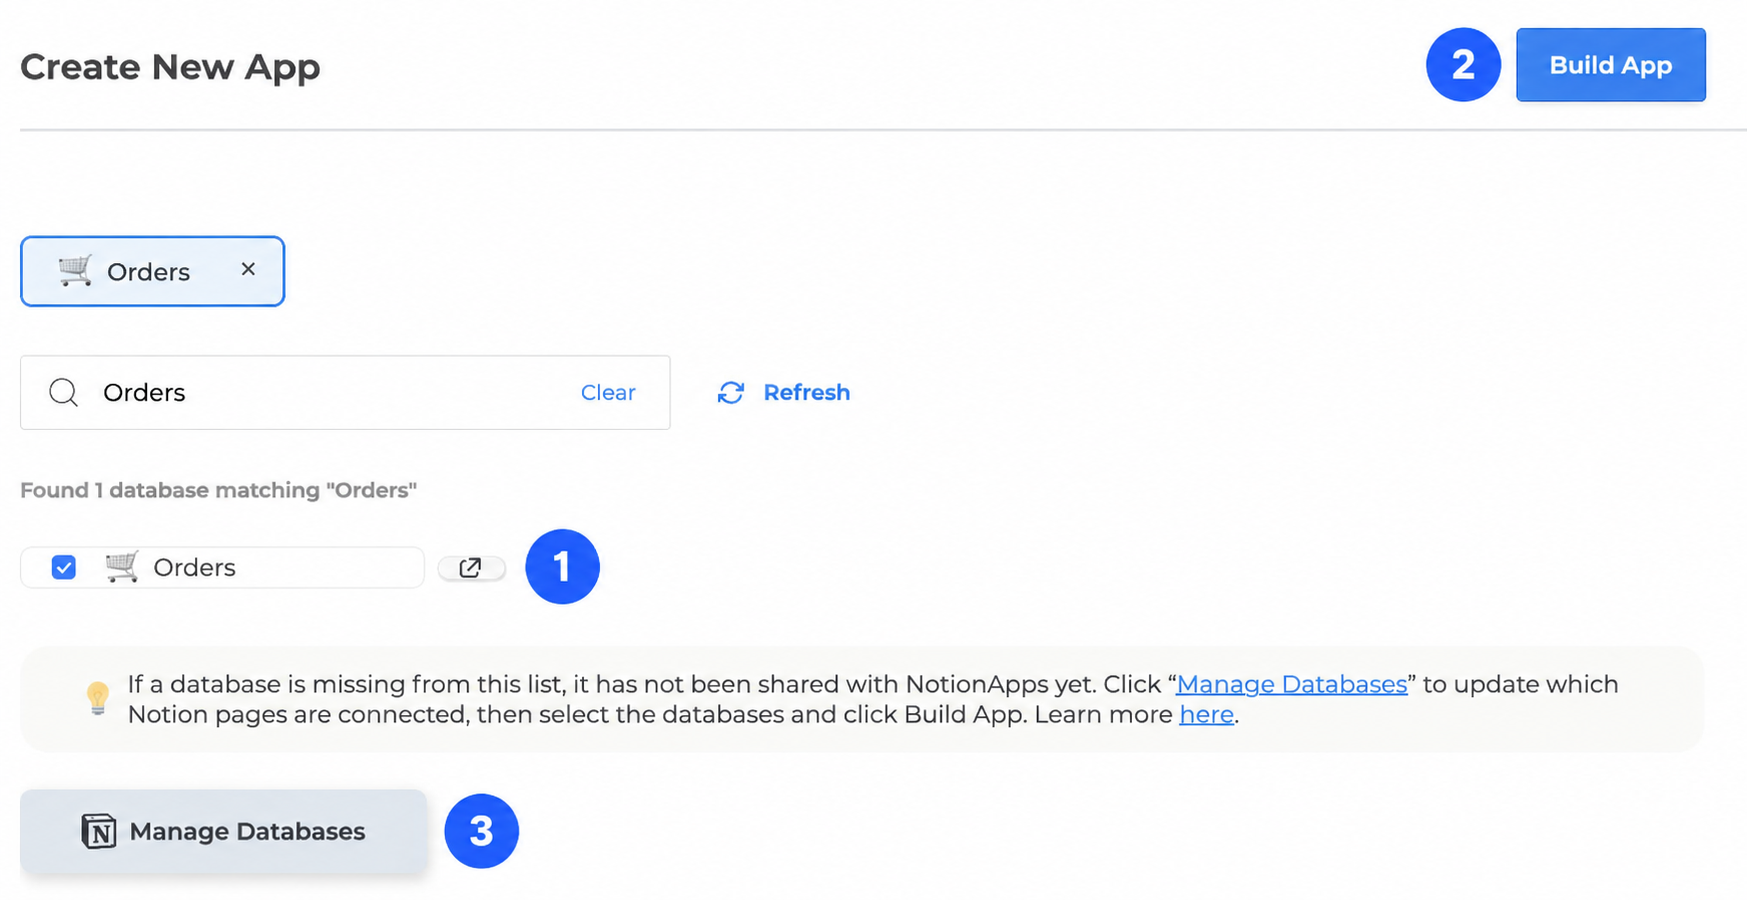
Screenshot callouts
Search and selection: Use the search field to find a database; the selected database appears above the search field.
Build App, upper right: Creates the app from the selected databases.
Manage Databases, below the results: Opens the connection flow when a required database has not been shared. Use Refresh after allowing time for a new connection to sync.
What to expect: This path connects your data. It leaves the screen design to you; it does not generate the app described in the automation paths.
Back on the database-selection screen returns to the creation choices.
Path 2: Create new databases and an app
Use this path when you want NotionApps to create the Notion structure as well as the app.
For directive examples, callouts, and the full walkthrough, see Build your first app with the NotionApps Provisioning Tool.
1. Choose new infrastructure
Select Create using automation → Describe your app, then choose Create a new app and its Notion infrastructure.
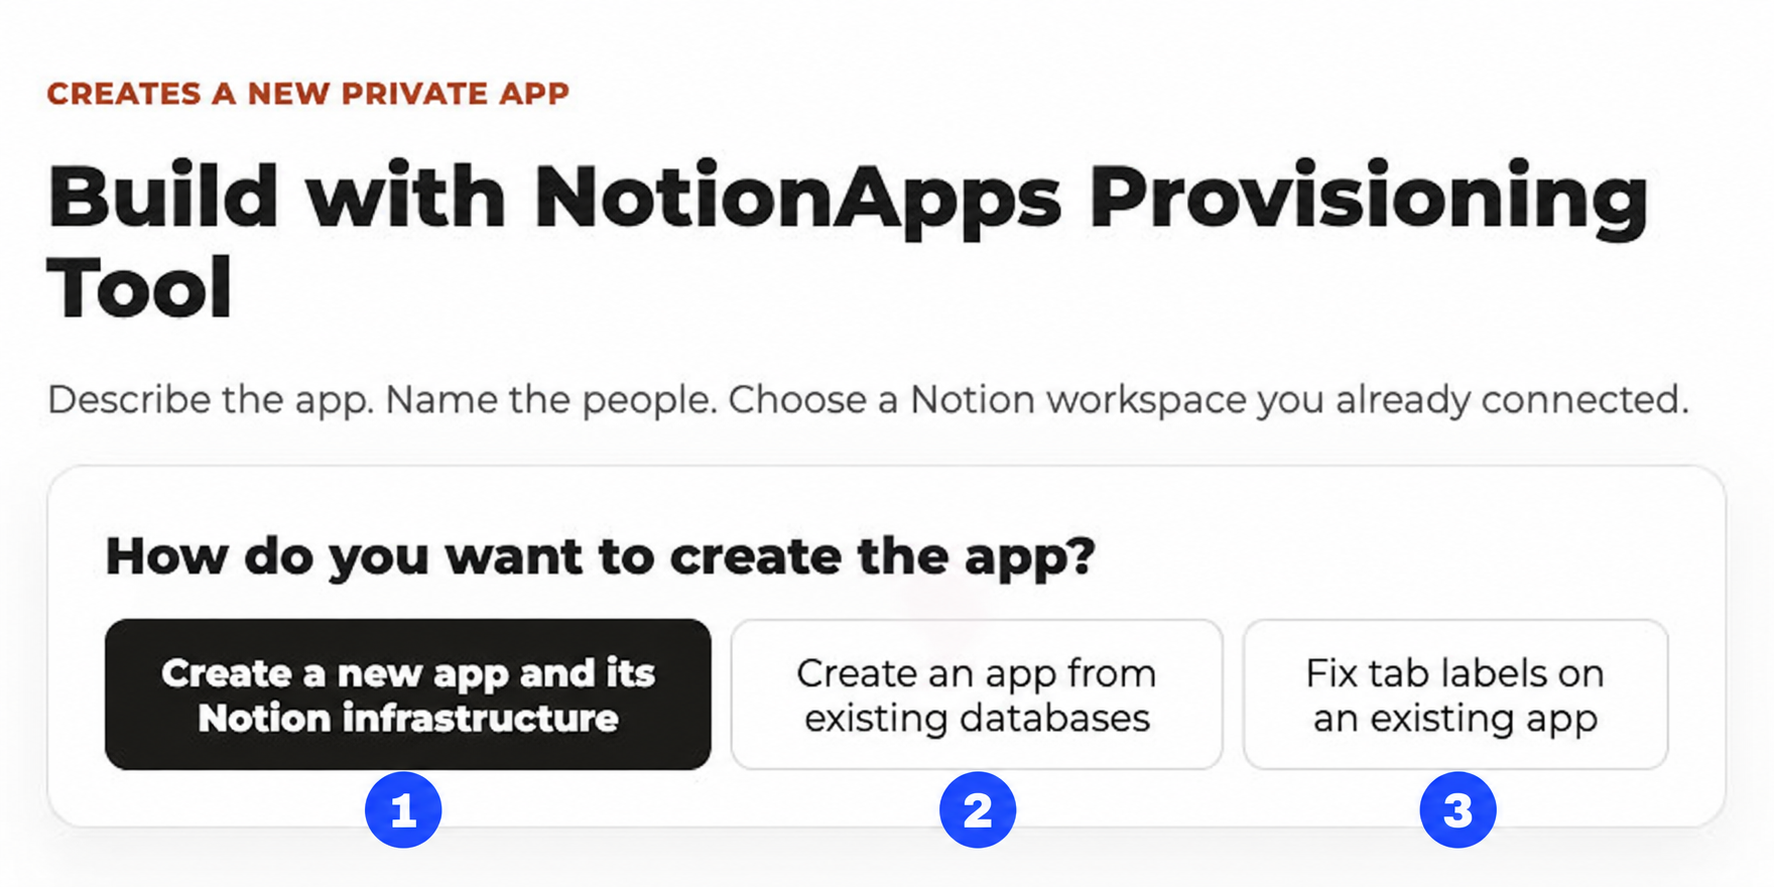
Screenshot callouts
Create a new app and its Notion infrastructure: Creates new databases and an app.
Create an app from existing databases: Uses the databases you already have; follow Path 3 instead.
Fix tab labels on an existing app: Repairs an existing app. It does not create a new one.
2. Describe the app
In What do you want to build?, explain:
Who uses the app and what each role does.
Who submits, views, updates, or approves each type of record.
Whether people need messages, announcements, or a public welcome page.
For example:
Employees submit service requests, managers approve them, and technicians complete work orders. Employees see their own requests. Managers see all requests. Technicians see assigned work orders. People can send messages. Roles: Employee, Manager, Technician.
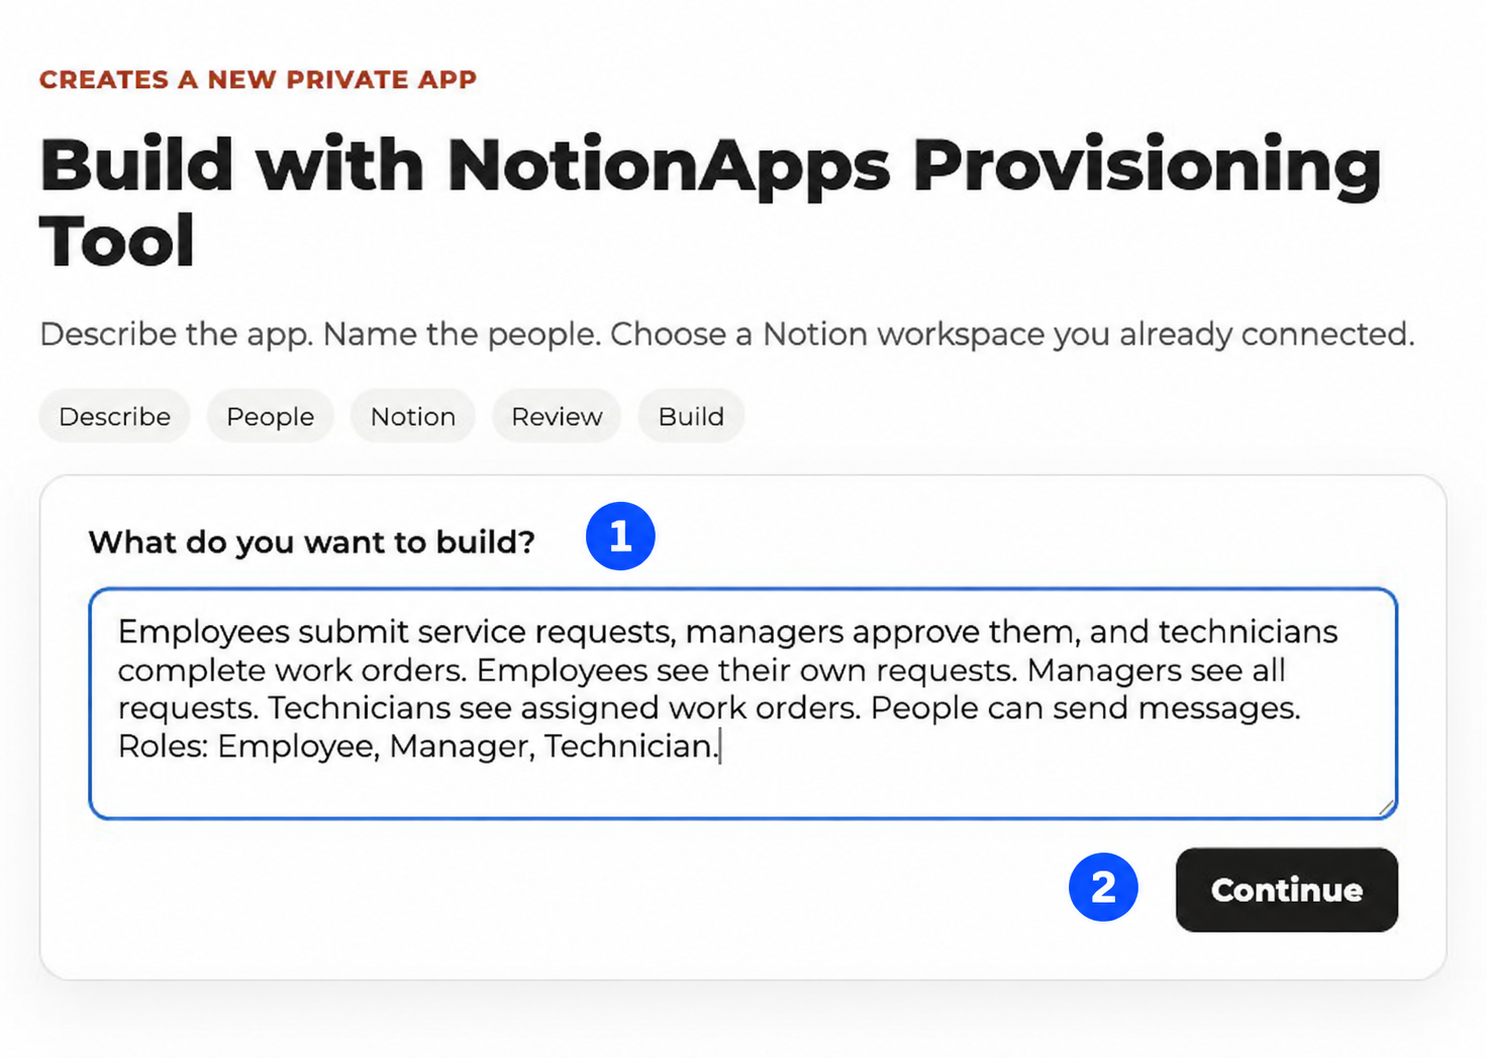
Screenshot callouts
What do you want to build?: Describe each role and its duties in the text field.
Continue: The description must contain text before you can continue. Specific duties give you a clearer plan to review.
3. Confirm roles and people
In Roles and seed users, confirm the suggested roles. Use Add a role → Add role for a missing role.
Read the duties listed under each role and check that they match your intended app.
Confirm your name, email, and role in the first person’s row.
Select Add seed user for each additional person who should already be in the app.
Give every person a name, email, and one role, then select Continue.
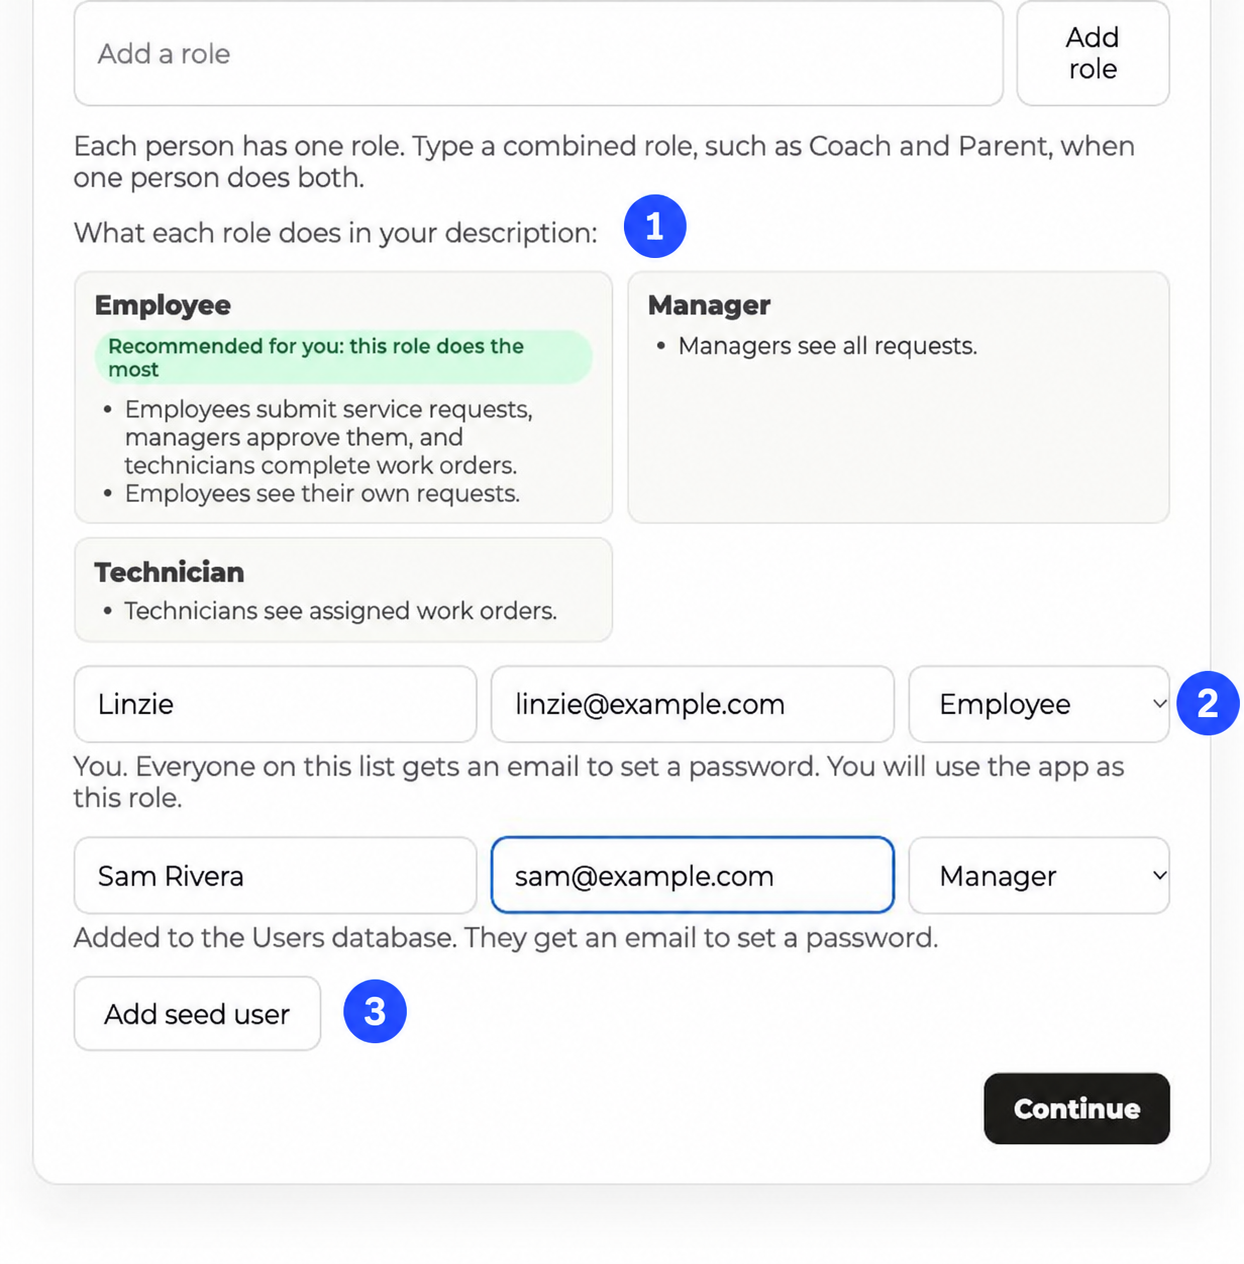
Screenshot callouts
Duty cards, above the people: Check what the description assigns to each role.
Role menu, beside each email: Assign one role to each person.
Add seed user: Add another initial user, then complete all required fields.
One person, one role: If someone does two jobs, create a combined role such as Coach and Parent and describe its duties. Do not assign two separate roles to that person.
4. Choose the Notion destination
Select an already connected workspace.
Choose Existing page and search for the destination, or choose Create a new page.
For a new page, enter New page name and select the existing parent page under Create it inside.
If Which confirmed role may approve? appears, choose the appropriate confirmed role.
Select Continue and wait while the plan is prepared.
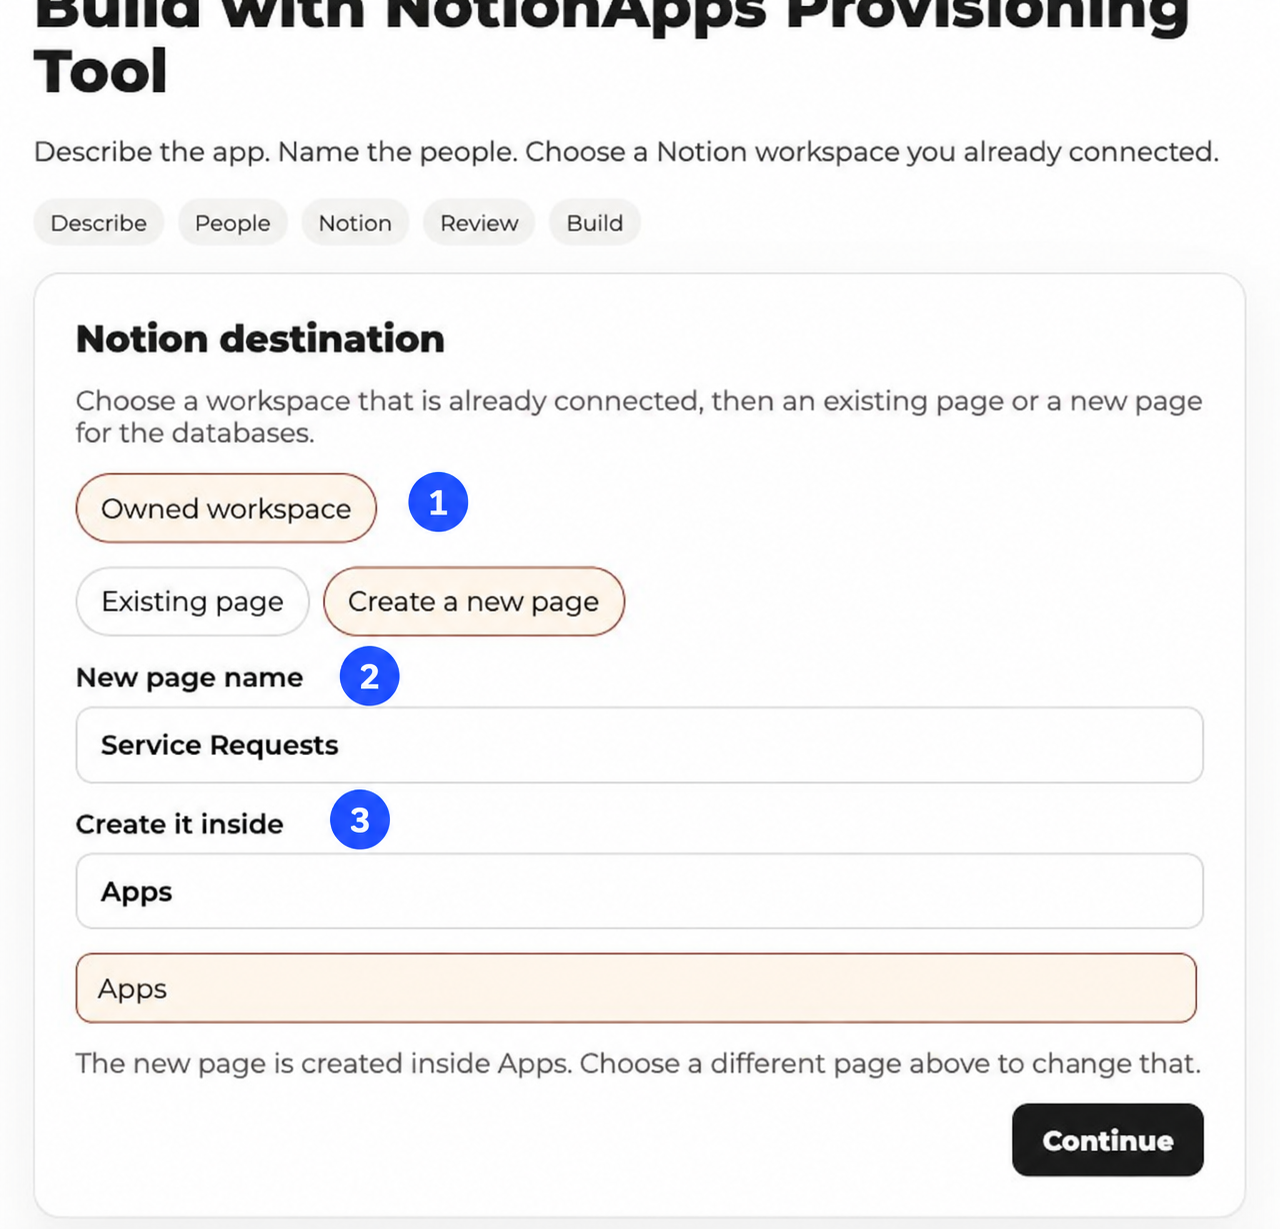
Screenshot callouts
Workspace: Determines which connected Notion workspace receives the new databases.
New page name: Names the container page being created.
Create it inside: Chooses the parent page. Read the confirmation beneath the page list before continuing.
No pages returned? Share a destination page with NotionApps, then select the workspace again. If only a search returns no results, check the search text and the selected workspace.
5. Review and edit the plan
On Plan review, check the roles, names and emails, destination, databases, screens, visibility, approvals, and any features listed as not included. Edit anything that does not match your intent.
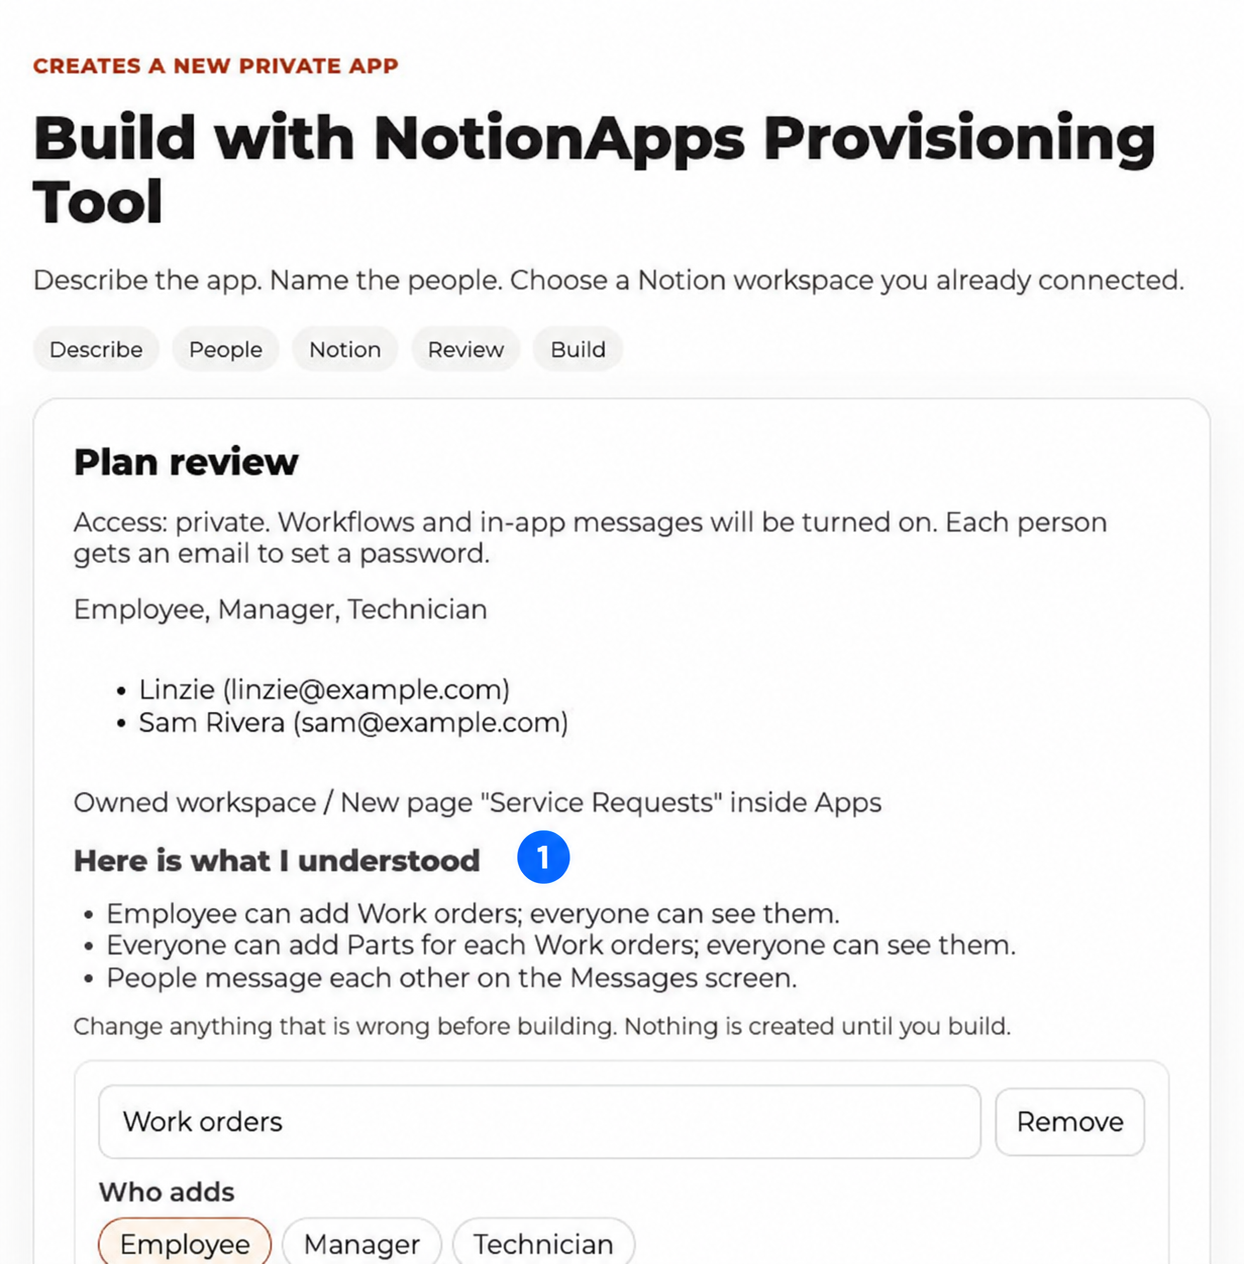
Screenshot callouts
Here is what I understood: Treat this as a proposal to check. Confirm who can add and see each type of record before building.
Scroll through the remaining controls and confirm the approving role and communication features.
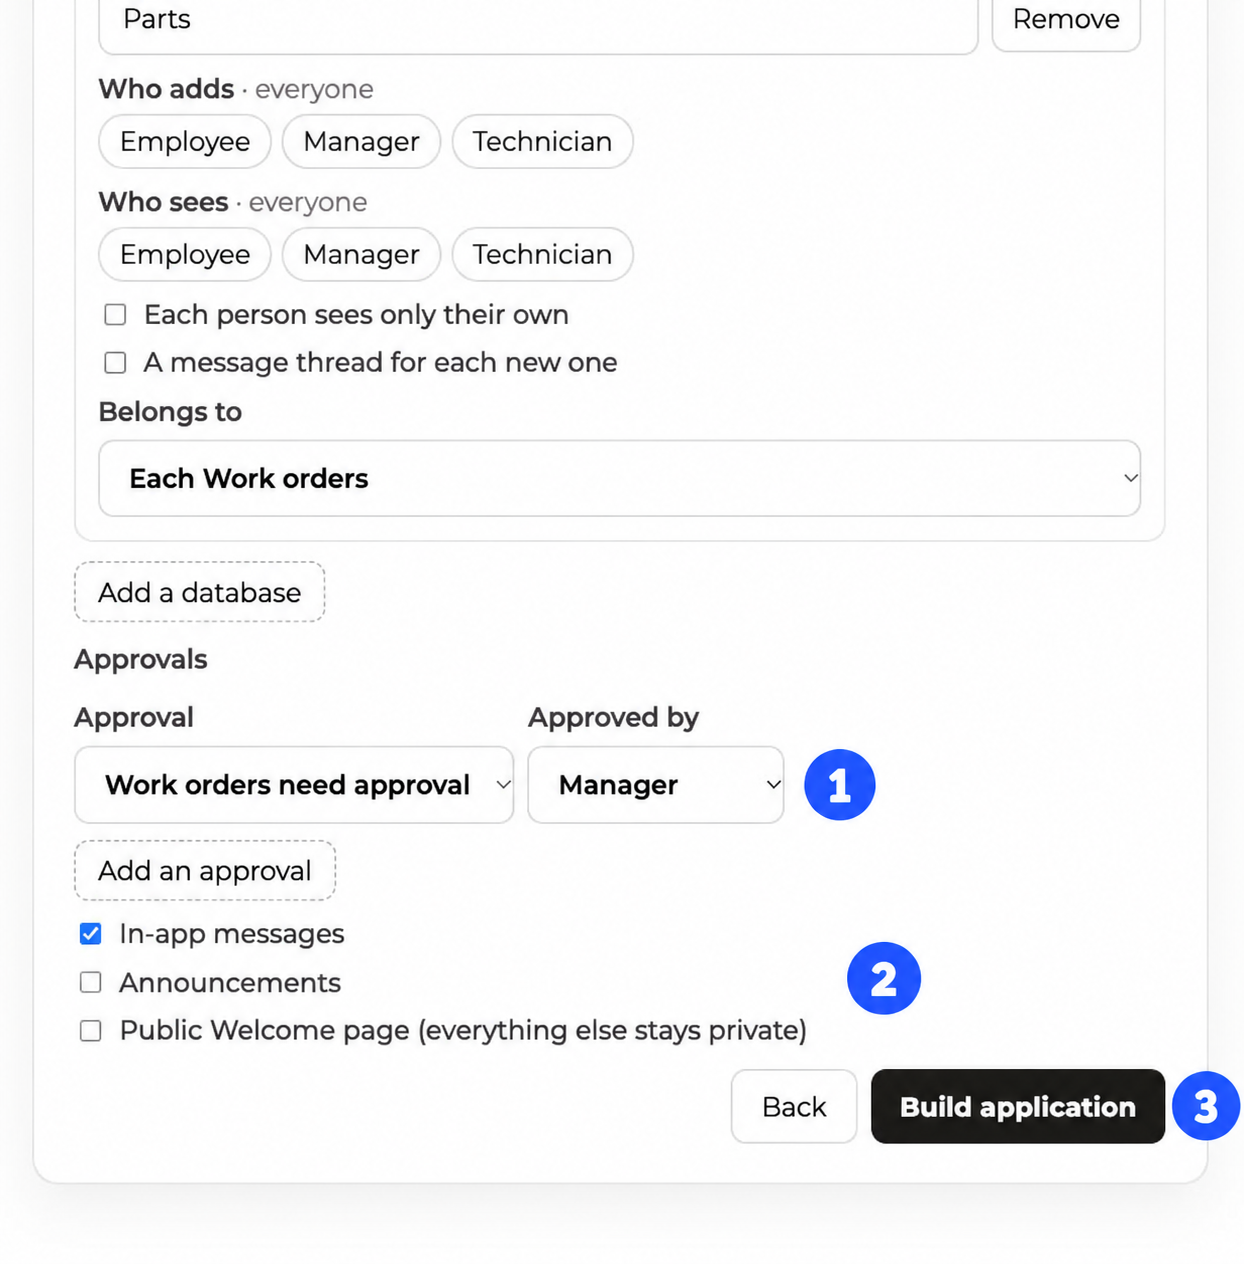
Screenshot callouts
Approval / Approved by: Choose the records requiring approval and the role that approves them.
Messages, announcements, and public welcome page: Review the selected features. A public welcome page does not make the rest of the app public.
Build application: Starts creation after you have checked the plan.
Review before creating: If the AI reader is unavailable, review the plan just as carefully. Use Change roles when offered to correct people or roles, and Back to correct the destination.
6. Build and open the app
Select Build application and leave the tab open while the progress screen reports each step. When the build completes, select Finish to open the app.
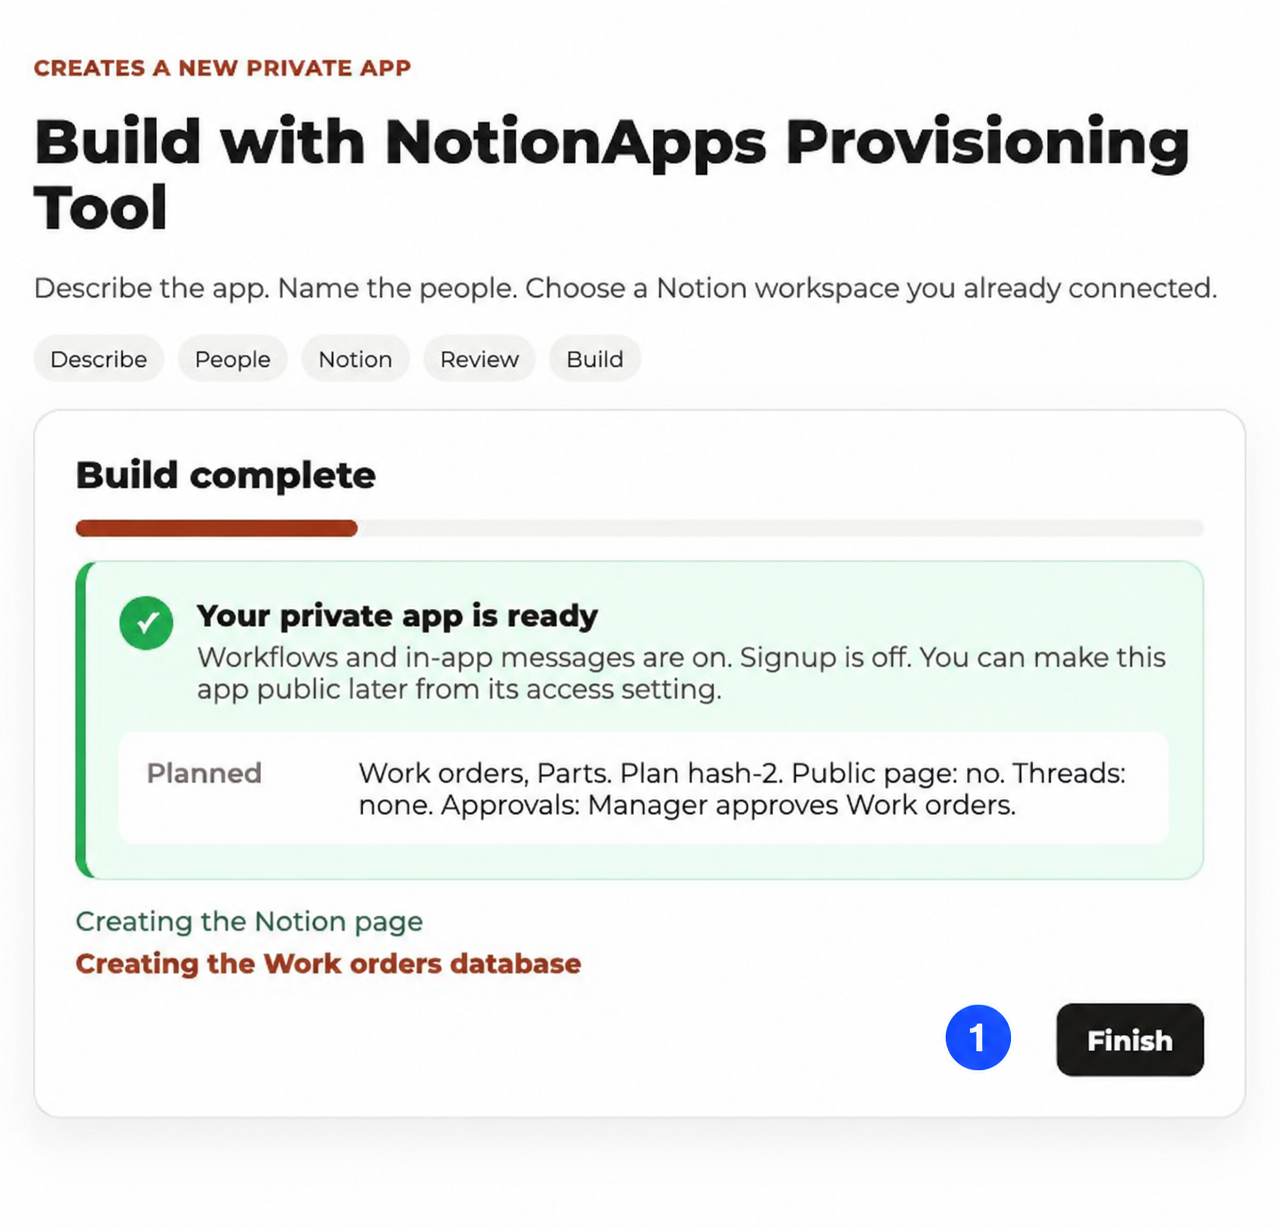
Screenshot callouts
Finish: Opens the completed app. Review the access and sign-in instructions provided by your build, then test the app using your assigned role.
If the build fails, read the error, choose Back to review, correct the plan, and try again.
Path 3: Build an app from existing databases
Use this path when your Notion data already exists and you want the provisioning tool to build the app around it.
The existing-database walkthrough, including the Users database and review screens, is in Build your first app with the NotionApps Provisioning Tool.
1. Select the source databases
Open + Create New App → Create using automation → Create an app from existing databases. Select a connected workspace, then select at least one database.
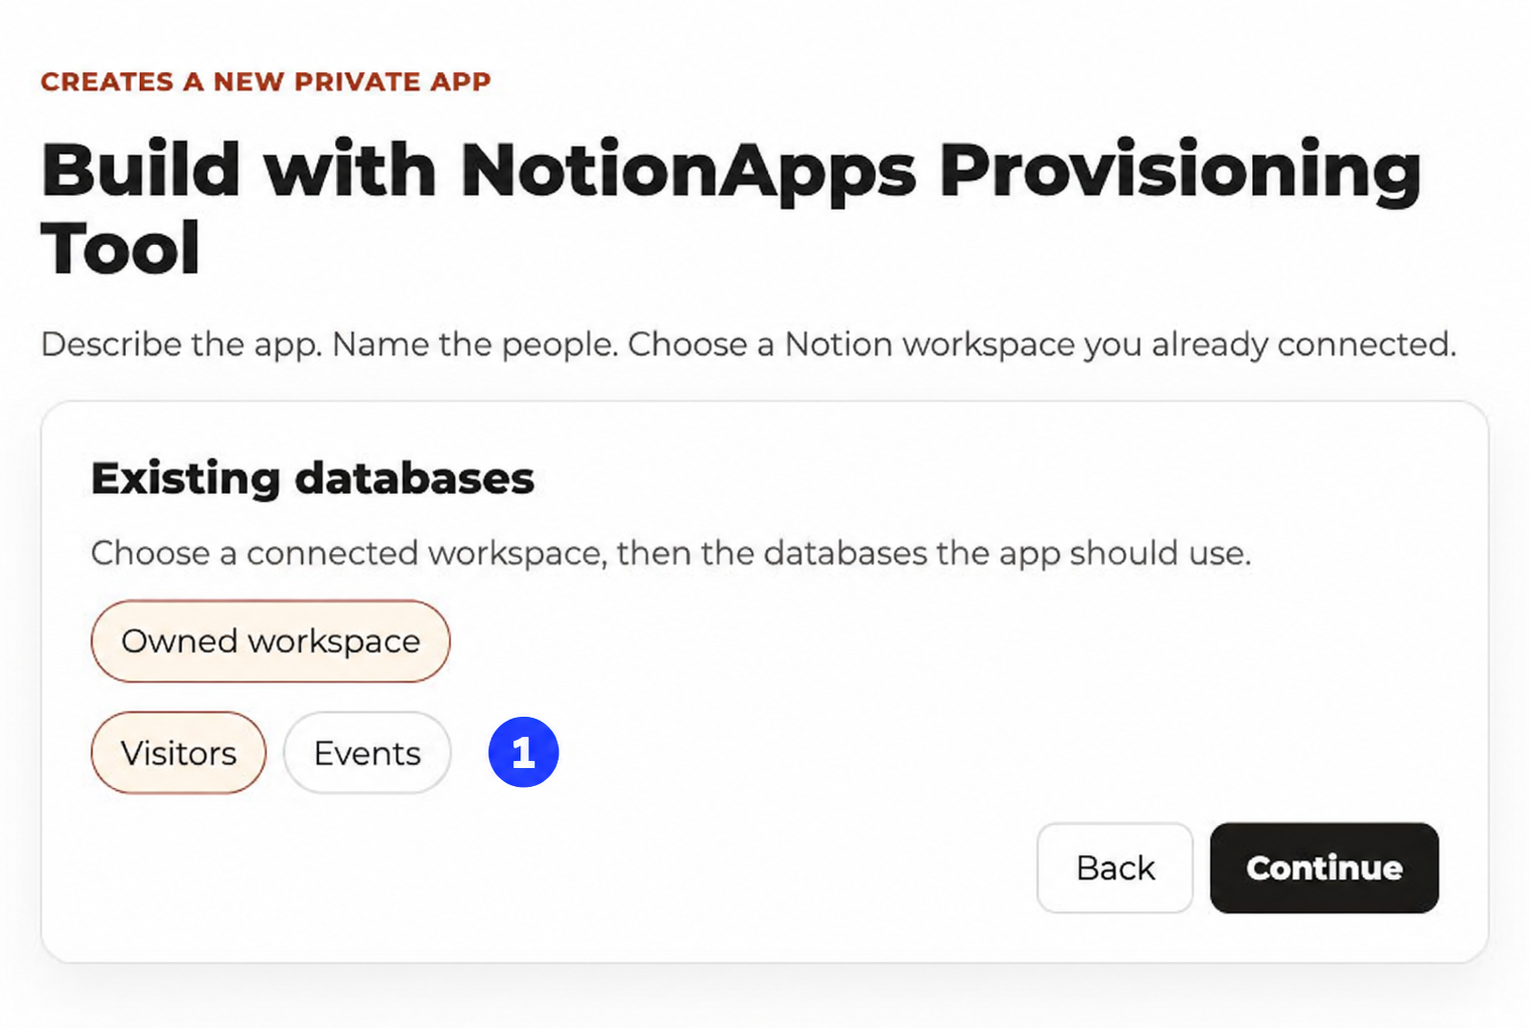
Screenshot callouts
Selected databases: Include every database the app should use. Selecting a workspace alone is not enough.
2. Describe how the app should work
Under How do you want the application put together?, describe the people, their duties, visibility, and approvals using the data you selected. For example:
Hosts record visitors and send messages to the reception team. Hosts see only their own visitors. Managers approve visitors. Roles: Host, Manager.
Select Continue.
3. Choose public or private access
Under Who can open this app?, select:
Private. People sign in with a Users database. Use this when people need to sign in.
Public. Anyone with the link can open it. Use this when sign-in is not required.
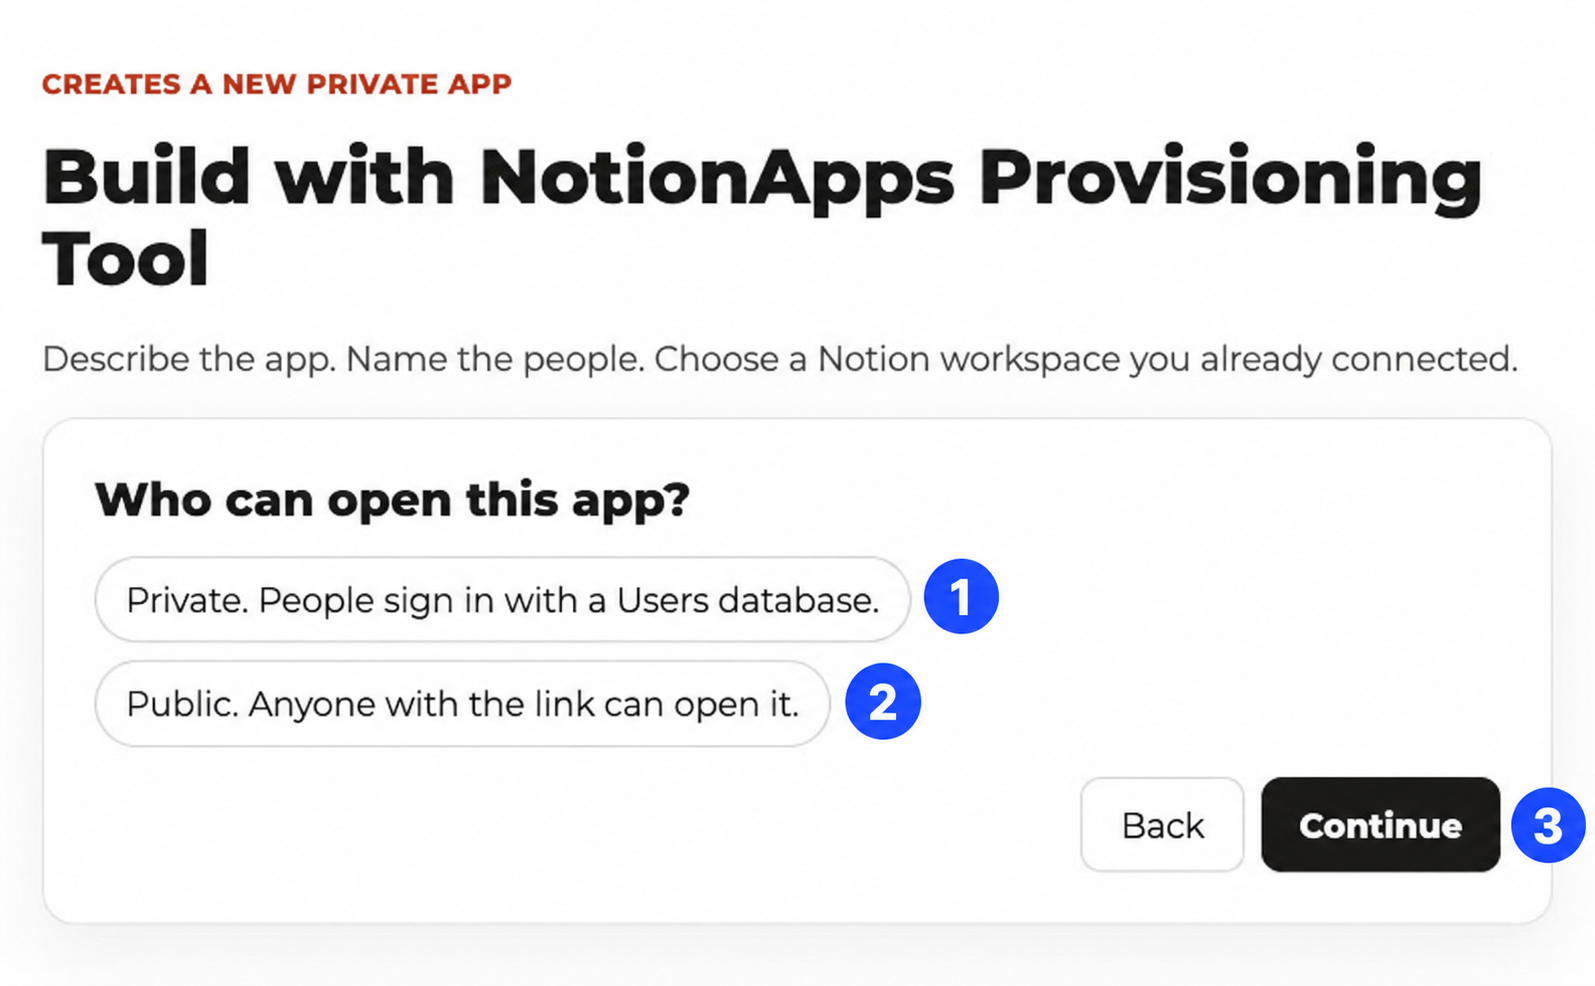
Screenshot callouts
Private: Require people to sign in through a Users database.
Public: Allow anyone with the link to open the app without signing in.
Continue: Confirm the access choice and move to the next step.
If the app is private and none of the selected databases is a Users database, choose Create a Users database and link it, select its destination page, and select Continue to roles. Alternatively, choose Create the app as public instead.
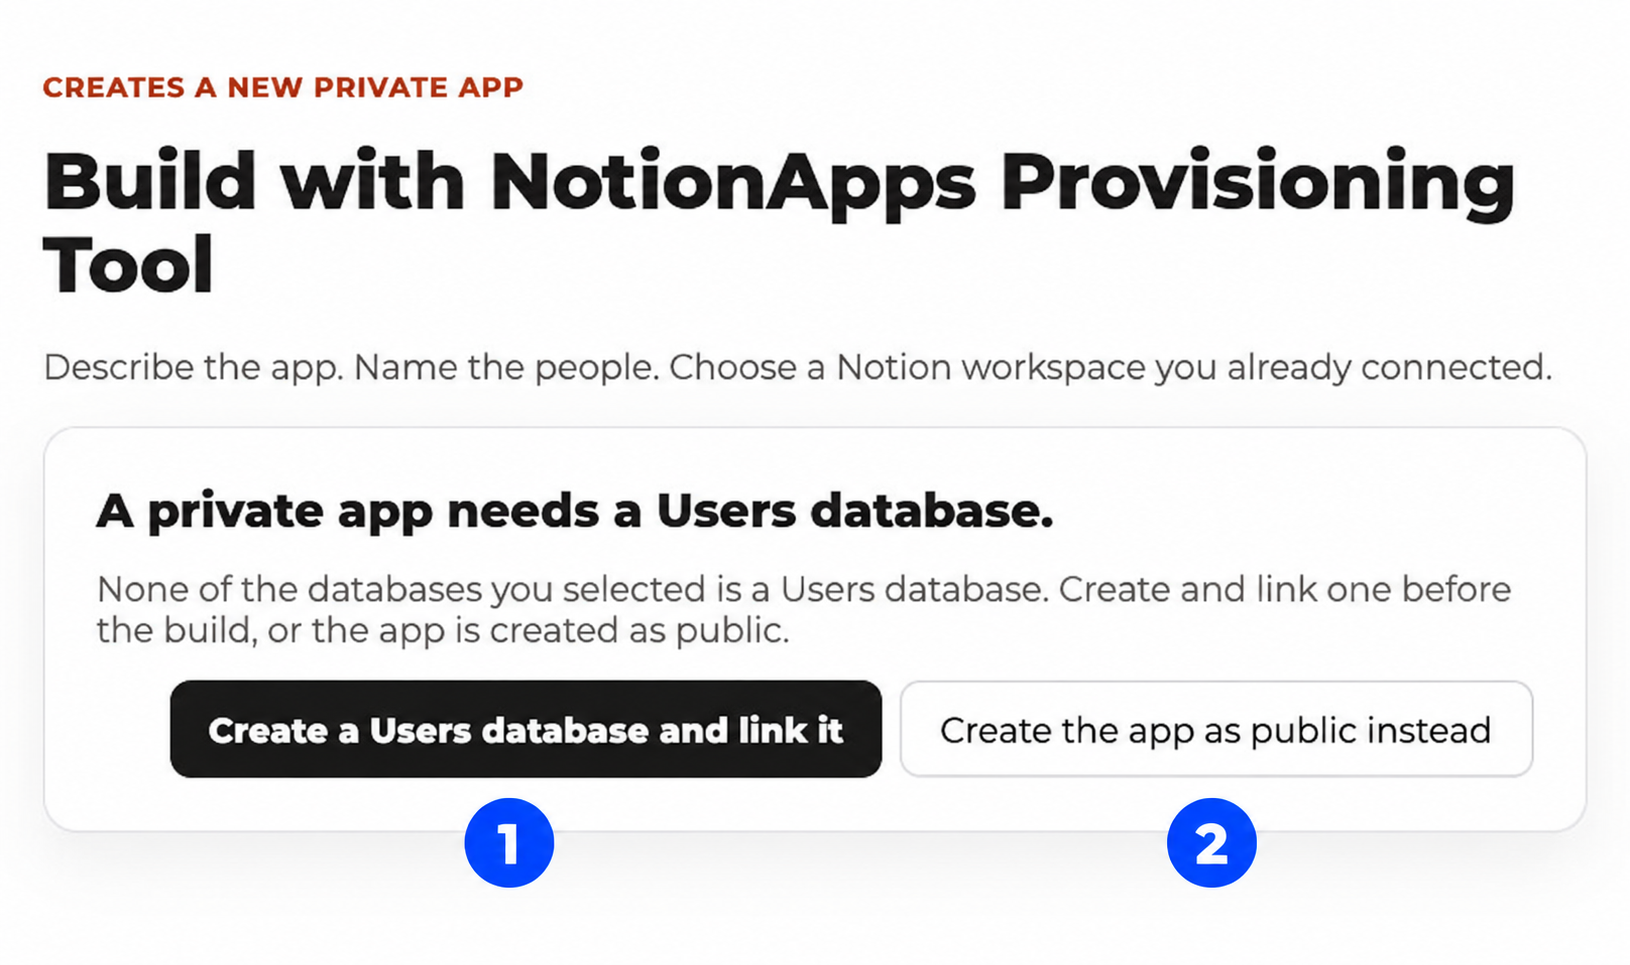
Screenshot callouts
Create a Users database and link it: Keep the app private and choose where its Users database will be created.
Create the app as public instead: Continue without requiring sign-in. Use this only when public access is intended.
Private apps need a Users database: Do not choose the public option simply to bypass this step if the app should require sign-in. The new Users database is created when you create the app.
4. Confirm roles and initial users
Where the flow asks for roles and people, confirm each role and provide a name, email, and one role per person. If an existing Users database needs a Role property, review the Add a Role property to the Users database in Notion option.
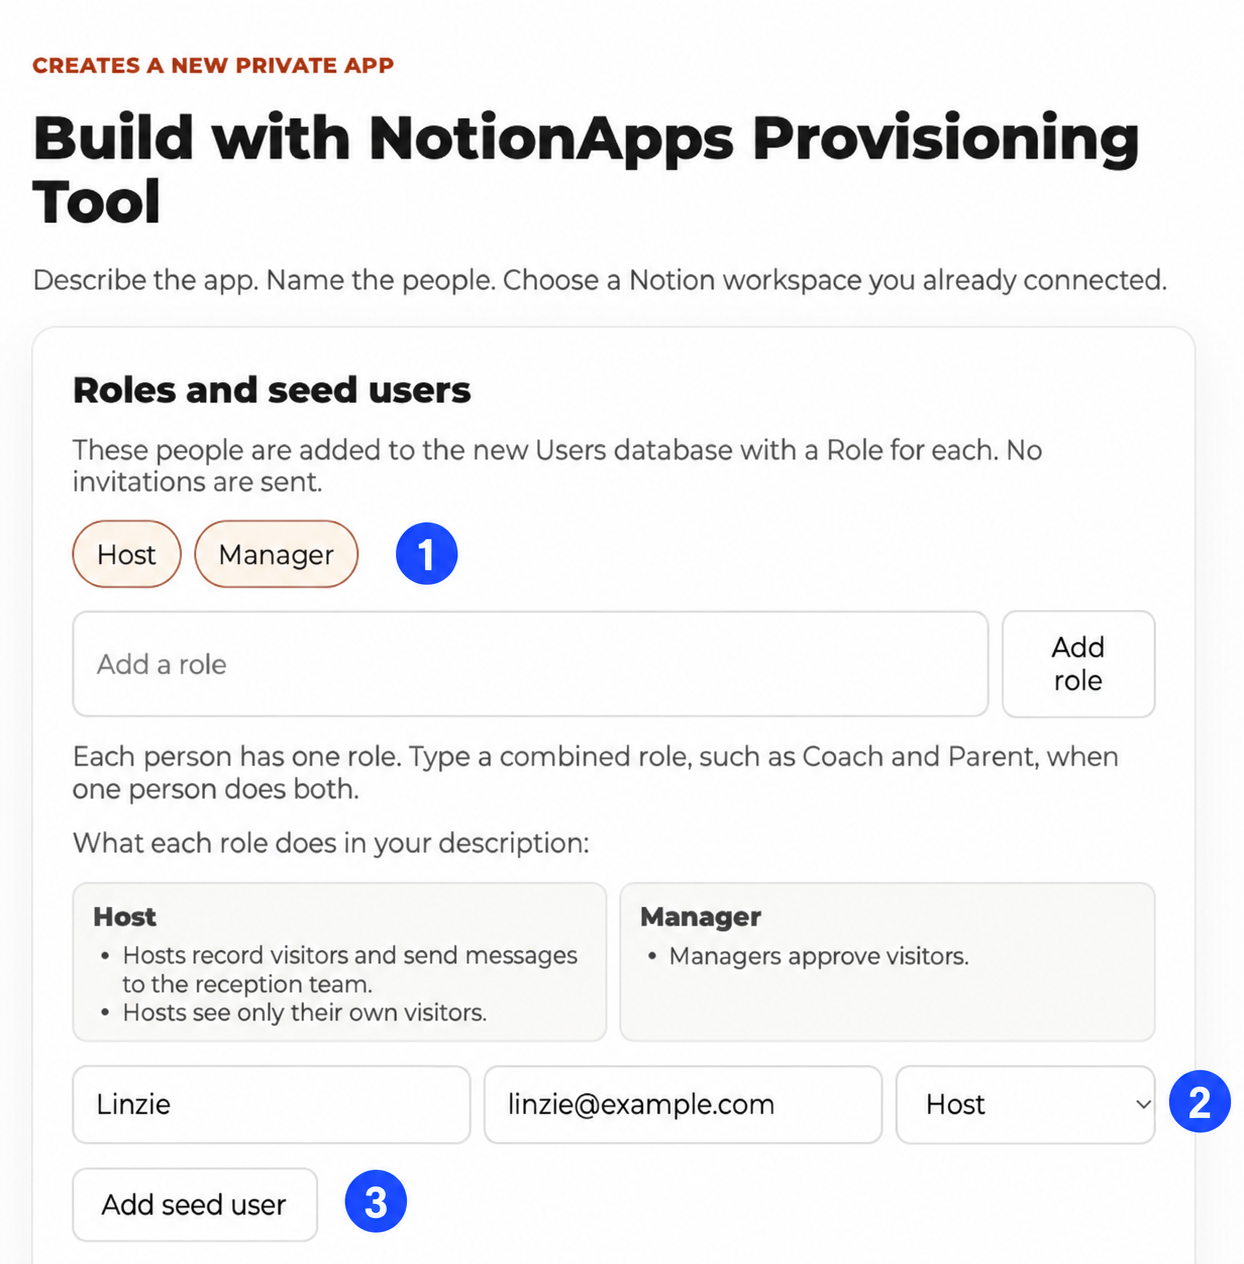
Screenshot callouts
Role buttons: Confirm the roles the app needs; add a missing role using the field below.
Person's role menu: Assign one role to the person in that row and check their name and email.
Add seed user: Add another initial user and complete their name, email, and role.
People already in the selected Users database are preserved. Initial users entered here are added to that database, or to the new Users database you chose to create.
No invitation email on this path: Adding initial users during creation from existing databases does not send invitations. Configure and test the intended sign-in method before sharing the app.
5. Review additions to Notion
The review either explains Here is how the app will be built or reports These databases do not cover that application.
Read the proposed behavior and any missing properties or databases.
Choose a role if Who approves? appears.
Review Add the missing properties and Add the missing databases, when shown. Keep only the additions you want selected.
If you edit the plan and see Update plan, select it and review the updated additions before continuing.
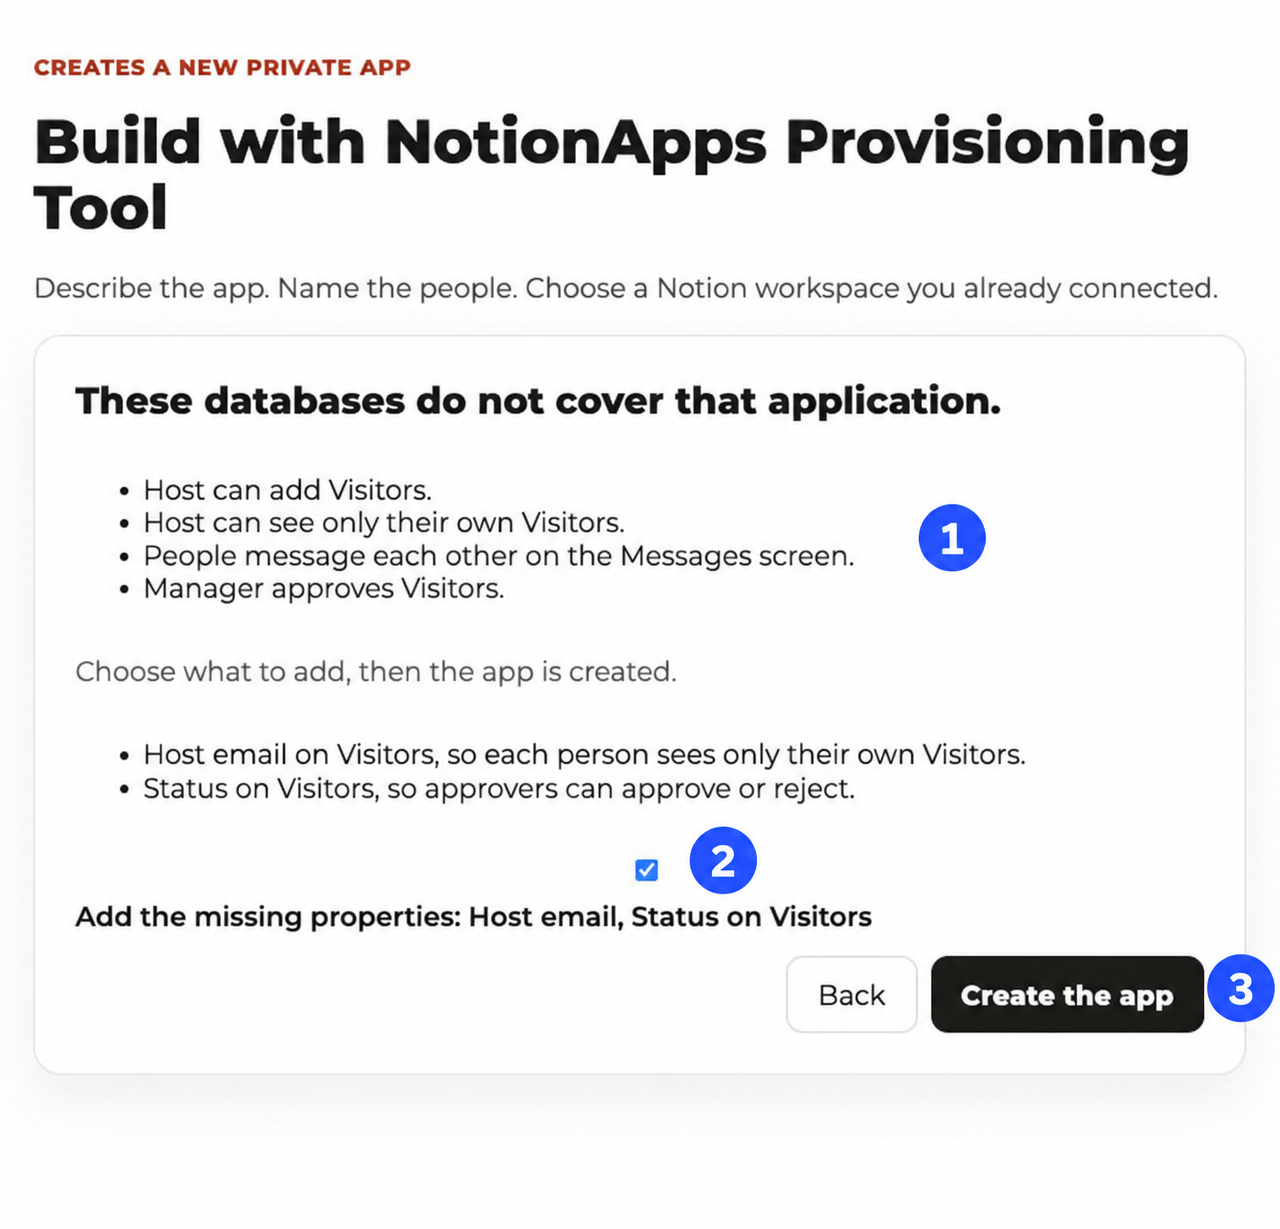
Screenshot callouts
Summary, above the additions: Confirm the intended record access, messaging, and approval behavior.
Add the missing properties: The list names the proposed changes. The checkbox may already be selected; clear it if you do not want those changes.
Create the app: Starts creation using the reviewed plan and selected additions.
This can change Notion: Check every proposed addition before building. Creating a Users database or adding a Role property also changes Notion when you select those options.
6. Create and open the app
Select Create the app, leave the page open while it runs, and open the app from the completed result. Check the connected data, generated screens, roles, and access before sharing it.
Path 4: Clone a sample app
This path starts with a finished example rather than + Create New App.
Open App Templates from the sidebar. Some versions label this area Sample Apps.
Open a template, preview it, and select Clone App when you want your own copy.
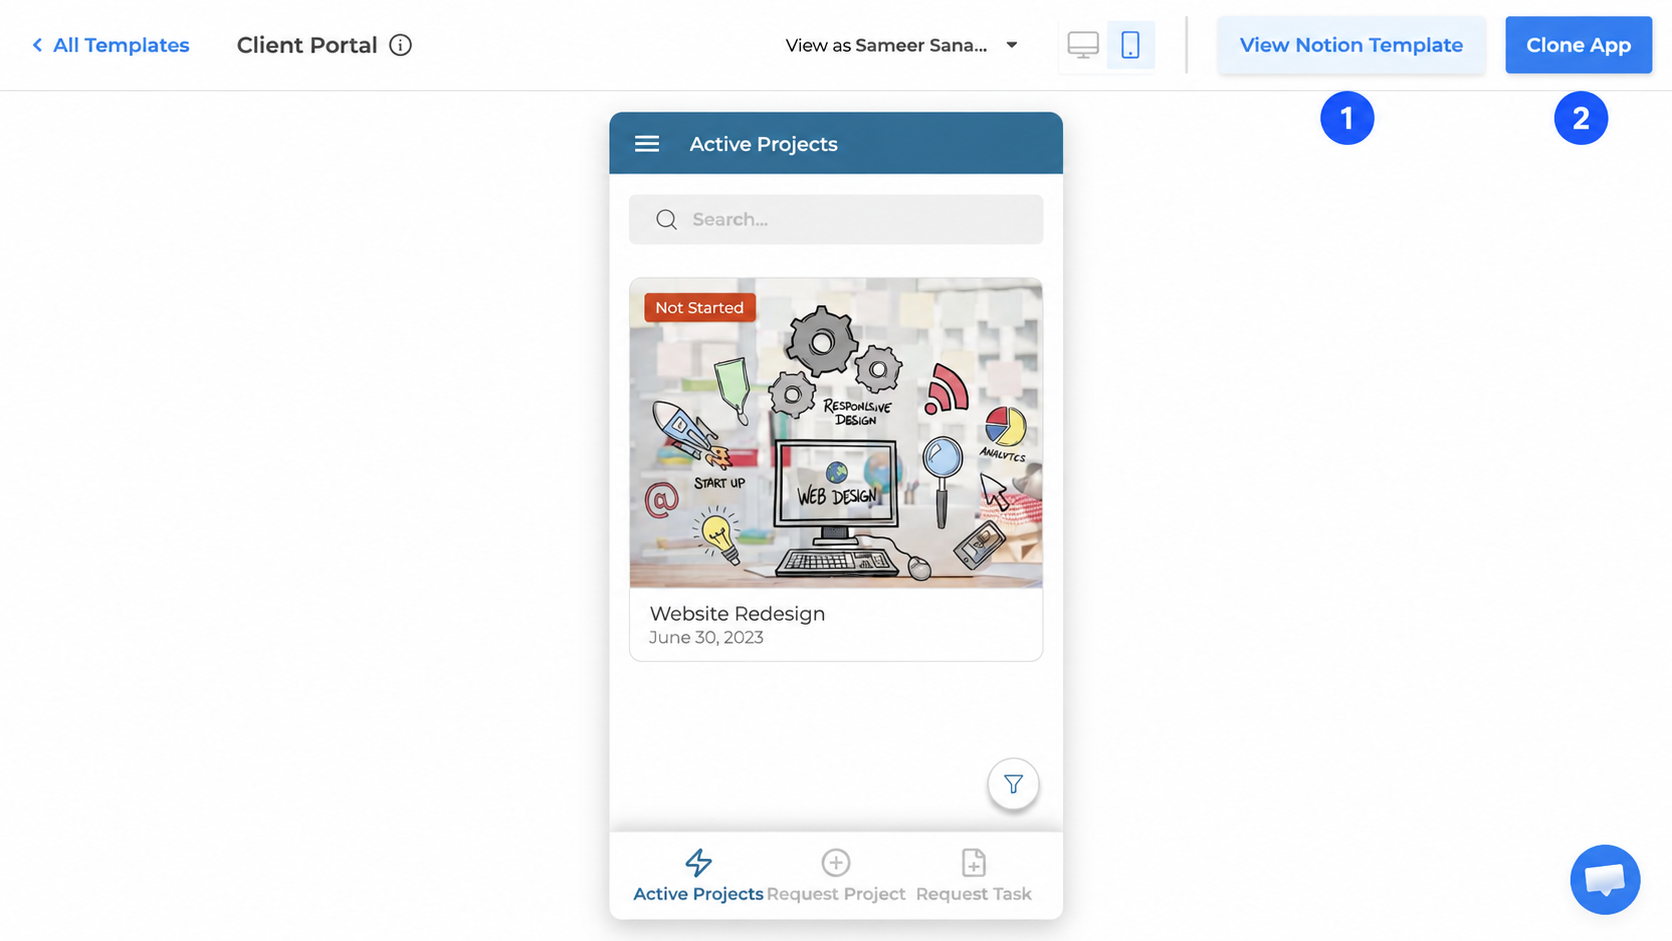
Screenshot callouts
View Notion Template: Inspect the sample's underlying Notion structure.
Clone App: Starts the process for creating your own copy.
Complete the three clone steps:
Step | What to do |
|---|---|
Duplicate Notion Template | Open the template in Notion and select Duplicate to copy it into your workspace. |
Connect Notion Template | Connect the workspace containing the duplicate and share the duplicated template page. |
Clone App | Select the workspace and duplicated template page, then select Clone App. |
Duplicate, then connect: Copying a template into Notion does not automatically share it with NotionApps. If it is missing at the final step, allow one or two minutes, select Refresh, and check the workspace and page permissions.
When cloning succeeds, the new app opens. If the result says automation needs attention, open Automation Home in that app and review the issue before publishing.
The clone uses your duplicated template data. Changes to your copy do not change the original sample.
Path 5: Duplicate an app you already own
Open My Apps.
Open the menu on the app you want to copy.
Select Duplicate App and confirm the dialog.
Wait for the new app tile, named Copy of followed by the original app name.
Open the copy and make your changes.
App copy versus template copy: Duplicating an app uses the same connected workspace and does not ask you to reconnect Notion. Do not assume it creates an independent copy of the underlying Notion data; check the linked databases before editing records.
Fix common problems
What you see | What to do |
|---|---|
Action required or Lost Access | Use Connect Notion or Reconnect Notion on My Apps and share the required pages. |
No databases available, an empty list, or a missing database | Check the selected workspace and page permissions in Manage Databases. Allow new connections time to sync and refresh the list. |
Requires a subscription | Use an available creation method or update your plan to use the provisioning tool. |
Continue is unavailable | Complete the required description, selection, destination, user fields, or approving role for that step. |
No pages were returned | Share a destination page with the connection, then choose the workspace again. |
These databases do not cover that application | Review the missing pieces and choose the additions you want, or revise the plan. |
The new-infrastructure build fails | Read the error, select Back to review, correct the plan, and build again. |
Before you share the app
Confirm the app uses the intended workspace, databases, and destination pages.
Review the screens, record visibility, user roles, and public/private access.
Test the actions, approvals, and messages your app needs.
Follow the First-app publish checklist before distributing the app URL.
For more detail, see Connect Notion, Start from a template / clone an app, and Plans and entitlements.
Questions and answers
Can I create an app on a phone?
You can sign in on a phone. Creating an app needs a laptop or desktop at notionapps.com.
Do I have to connect Notion before I create an app?
Yes. Sign up or sign in, open My Apps, and select Connect Notion. If the status is Lost Access, select Reconnect Notion. Choose the workspace, share the pages NotionApps should use, and approve access before you select + Create New App.
Why is a database missing after I connect a workspace?
A connected workspace does not share every page. Open Manage Databases, share the missing page or database, and return to the creation step. Allow one or two minutes for newly connected data to appear, then select Refresh.
Which creation path should I use?
Use the empty builder when your databases already exist and you want to design the screens. Use new Notion infrastructure when you want new databases and generated screens. Use existing databases when the data is already in Notion and you want generated screens. Clone a sample app when a template is close to what you need. Duplicate an app you already own when you want another version in the same workspace. The full provisioning walkthrough is Build your first app with the NotionApps Provisioning Tool.
Why does Create using automation say Requires a subscription?
Paths 2 and 3 use Create using automation and require a paid subscription. The empty builder, sample apps, and Duplicate App stay available without that provisioning feature. Account limits and template features can still affect those methods. See Plans and entitlements.
What is the difference between the empty builder and existing databases?
The empty builder connects the databases you select and leaves the screens for you to design. Creating from existing databases uses the provisioning tool to build the app around those databases, including the property and database additions you approve.
Can one person have more than one role?
Each person gets one role. When someone does two jobs, create a combined role such as Coach and Parent and describe its duties.
Does a public welcome page make the rest of the app public?
A public welcome page is one feature on the plan review. It leaves the rest of the app private. On the existing-databases path, choose Private when people must sign in, or Public when anyone with the link should open the app.
What if a private app has no Users database?
Choose Create a Users database and link it, then select its destination page. The Users database is created when you create the app. Choose Create the app as public instead only when the app should open without sign-in.
Are people emailed when I add them from existing databases?
Adding initial users on the existing-databases path does not send invitations. Set up and test sign-in before you share the app. People already in the selected Users database stay in that database.
Does Duplicate App copy my Notion databases?
Duplicate App copies the app in the same connected workspace. Check the linked databases before you edit records, because the copy can still use the original Notion data.
What should I do if the build fails?
Read the error, select Back to review, correct the plan, and build again. Leave the tab open while a build is running.